List of contents:
- Introduction
- Access Token Setup
- Adding Videos with the Shortcode Editor
- Adding a Vimeo Channel, Showcase or Portfolio
- Privacy Settings
- Automatic Video Captions and Splash Images
- Automatic Subtitles, Chapters and Transcripts
- HLS and MPEG-DASH Support
- Live Streaming with Vimeo
- Turbocharge Ajax Vimeo Loading
- Preferred API Location Setting
- How To Fix Splash Images
- Convert Embed Codes
- Troubleshooting
Introduction
We really like Vimeo video hosting here at Foliovision. Vimeo offers creative film makers almost unlimited hosting for just $59.95/year (Vimeo Plus). Even more unbelievable, unlimited commercial video hosting for marketers and commercial websites with privacy is just $199/year (Vimeo Pro).
We made sure, that FV Player Pro integrates seamlessly with Vimeo as it is the closest-to-perfect and most headache free video hosting available right now. With FV Player Pro, you can enjoy an unbranded player with very little disturbing elements, truly putting your content to the center of atttention.
You can also customize your autoplay, width and height settings. Both automated and manual quality switching works well with the Vimeo files. Any time Vimeo updates their video API, we’ll update FV Player Pro almost immediately, saving you lots of work.
Access Token Setup
In order to stream video with Vimeo Plus or Pro, your Vimeo access token is required. Follow these steps to successfully connect your Vimeo account with FV Player.
Due to Vimeo’s terms of use, we require you to let us check your account before serving videos via FV Player.
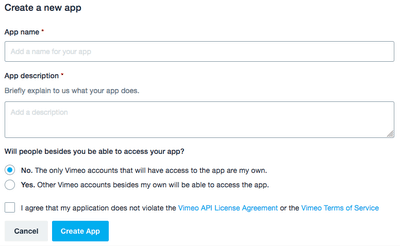
1. After logging in to Vimeo, click on the create a new Vimeo App (or use the link: https://developer.vimeo.com/apps/new).
2. To create a new app, simply fill in your App name, App description, and of course, agree with the terms and conditions. Then click Create App.
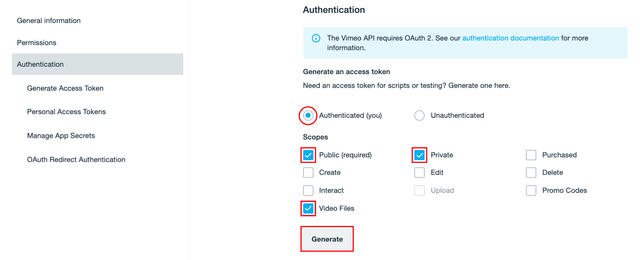
3. Go to Authentication tab, scroll down and click Generate Access Token. Under Generate an access token, select Authenticated (you) and make sure you choose the following scopes:
- Public
- Private
- Video Files
4. Then click Generate to get your access token and copy it to your clipboard.
5. Go to your WordPress admin interface FV Player Pro > Settings > Hosting tab > Vimeo (Pro) and:
- Check “Advanced Vimeo embedding
- Paste in your Access token int the “Access token” field
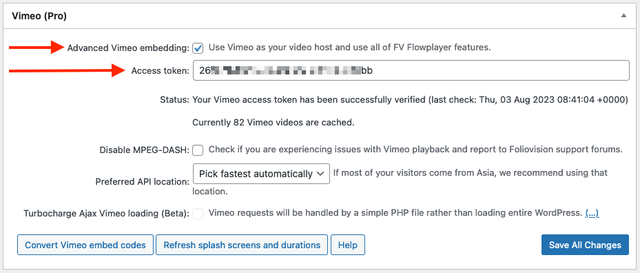
6. Click Save All Changes.
Adding Videos with the Shortcode Editor
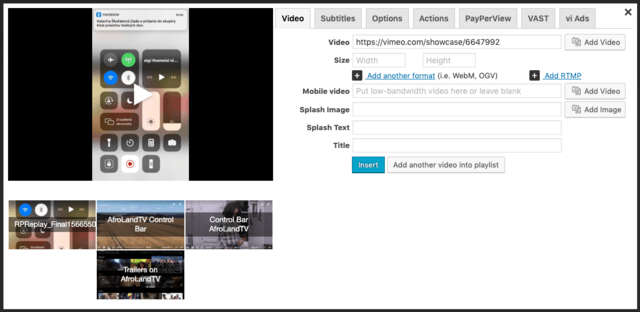
Open the shortcode editor in a post (or page) and insert the video URL into video box. You need to use the numeric Vimeo URL in it’s full form. For example: “https://vimeo.com/197701695”.

Adding a Vimeo video through FV Player’s shortcode editor
You can set the width and height of your video, and select a splash image. If you do not choose a custom splash image, the original splash screen from Vimeo will be used automatically. To set a splash image, simply click on in the shortcode editor and choose one from your library or upload a new one. The image should have the same size (pixels) as the player.
Click insert and publish. Here is the result:
A video with a custom splash image:

City of Bratislava
And here is the example with a Vimeo splash image:

High Above Peru
Adding a Vimeo Video Channel, Showcase or Portfolio
To embed Vimeo Channel, Showcase or Portfolioon your website, simply paste the URL into the video field of FV Player editor.
That will load the whole playlist of videos from Vimeo and keep it refreshing in the background every 15 minutes to make sure it’s always in sync with what you post on Vimeo.
To see how it works, you can watch our demo.
Automatic Video Captions, and Splash Images
As mentioned above, FV Player automatically parses the splash image from Vimeo, if you don’t select it manually. This also happens with the titles. If you don’t override this by adding these manually, then the player will use parsed files from Vimeo.
If you want to use a different splash image, or title, than the ones the player pulls from Vimeo, you can always change it. You can upload or set a splash image in the shortcode editor. To change or delete the automatic title, just rewrite the title field in the shortcode editor.
Privacy Settings
With a Vimeo Pro/Plus subscription you can set up custom privacy settings to stop your video from appearing on vimeo.com, to disable embedding of your videos, or to stop download of your videos. Settings can be changed anytime per chosen video, or they can be applied to all your videos at once. Here are some sensible privacy settings as an example.
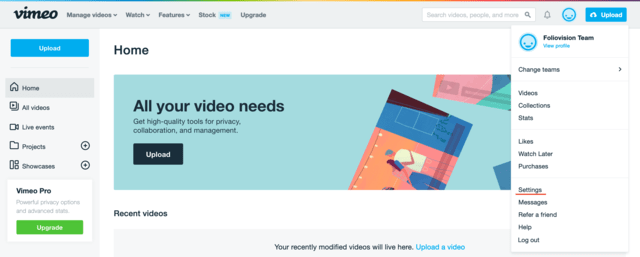
1. Go to vimeo.com, hover over your profile image, select Settings.
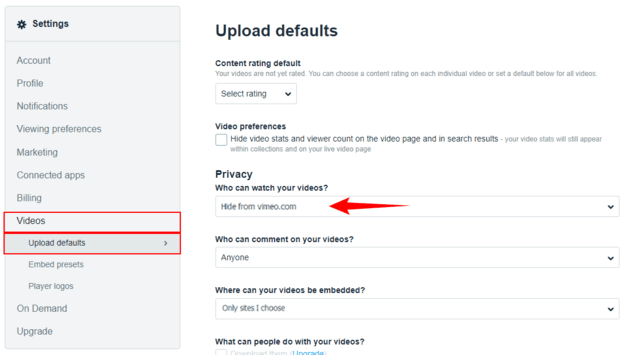
2. Click Videos in the left-hand menu, scroll down to Who can watch your videos?. If you don’t want visitors to Vimeo to be able to see your videos on Vimeo, here’s where you make that change.
3.Select Hide from vimeo.com. If you want your settings to be applied to all videos, select Also apply to all existing videos.
4. Click Save.
You can pick Private too, but then the videos will only play in FV Player Pro or if you are logged in to Vimeo and nowhere else.
Privacy Settings For Individual Videos
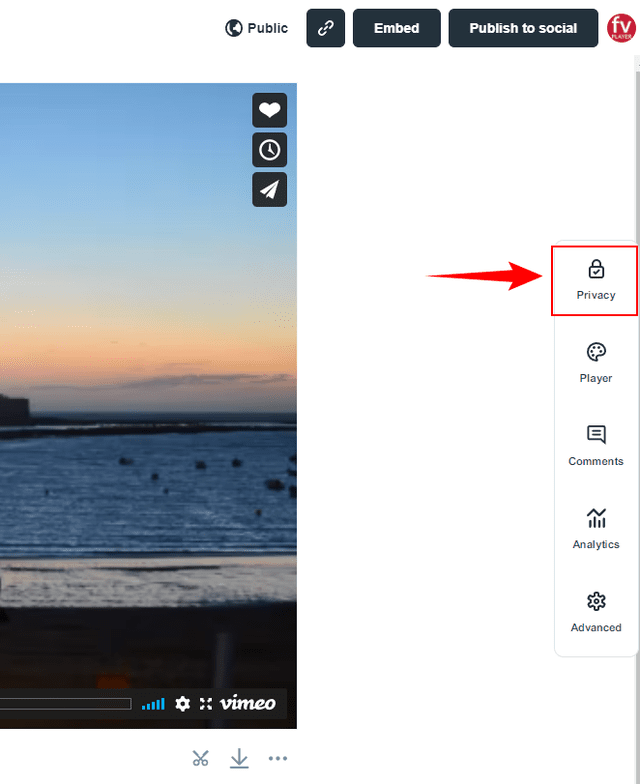
1.Click the video in your Vimeo dashboard to start editing it. In the right hand menu, click Privacy:
2.In you only want to play your videos with FV Player Pro you can pick Private.
Tip: You can also set the privacy settings while uploading the video.
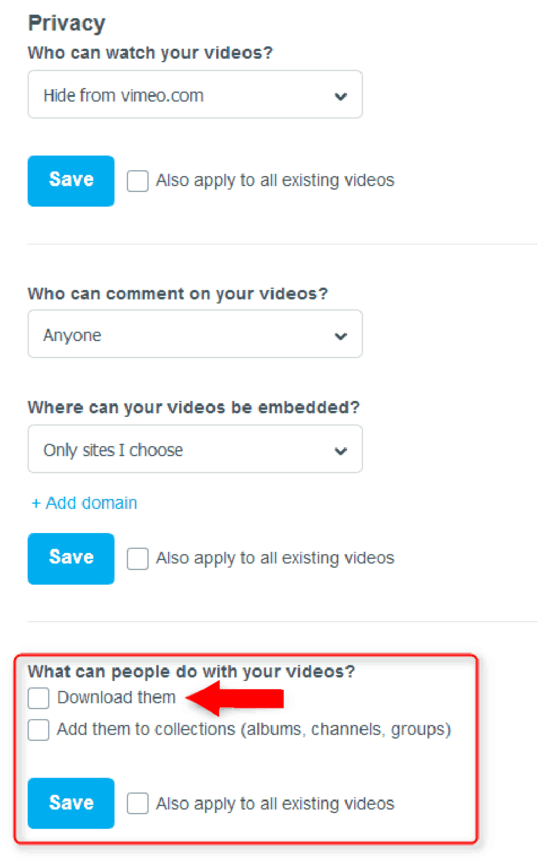
How to disable easy download of your videos
1. In Settings > Videos scroll down to What can people do with your videos?
2. Uncheck the box Download them. If you want this setting to be applied for all your videos, select Also apply to all existing videos. Click Save.

Disabling video downloading
Automatic Subtitles, Chapters and Transcripts
FV Player allows you to manually add subtitles in multiple languages in VTT or SRT format for any video, including the ones hosted on Vimeo (for more info on how to manually add subtitles see the guide How to Create Subtitles.The same goes for VTT Chapters.
FV Player Pro can also automatically load subtitles and chapters directly from Vimeo. If you have a Vimeo video with subtitles and/or chapters already set, you don’t have to set anything else. All the files available for the given video will load automatically, and users will experience the same behavior as with manually added subtitles or chapters.
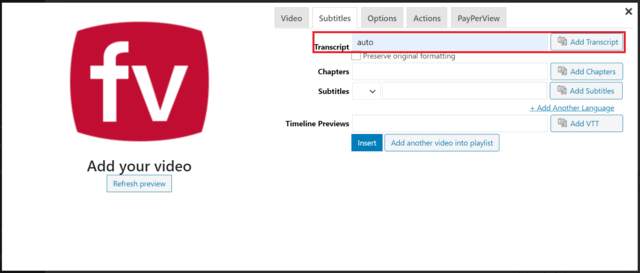
You can also simply write “auto” into the field for uploading transcript in the shortcode editor:
And then the video subtitles will show as the video transcript.
HLS and MPEG-DASH Support
FV Player supports Vimeo’s HLS and MPEG-DASH streams, and can play such videos on the majority of devices. Read more about HLS in this guide – Using HLS With FV Player. You can also read this post to learn more about the MPEG-DASH technology.
Live Streaming with Vimeo
FV Player supports Vimeo’s HLS and MPEG-DASH streams, and can play these videos on most devices, but Vimeo live-streaming requires the purchase of an add-on. You can buy it here.
Turbocharge Ajax Vimeo Loading
We have implemented an Ajax function that will use the PHP file for loading Vimeo requests, thus removing WordPress from the whole video loading process. The result will be faster loading of Vimeo videos. A great help for everyone, especially the websites with high traffic.
To be able to activate this feature, you will first have to add a line of code (which features a key unique for every user) into your wp-config.php file.

Turbocharge Ajax Vimeo Loading
You should be able to access the wp-config.php via FTP. It’s usually located in /public_html/site/.
Preferred API Location Setting
There have been reports of issues with Vimeo API selecting servers from a different location than the viewer’s, which led to increased loading times of videos. This was especially significant for the Asian region, in which viewers received content from North American servers.
We decided to fix this by adding an option that will allow users to manually select which set of servers the player will prefer, based on their location.

Preferred API location drop-down in FV Player Pro settings
You can pick from four options:
- Pick fastest automatically
- North America
- Europe
- Asia
The Pick fastest automatically option is the basic setting that retains the default behavior. The other three options will allow you to select the specific region from which the videos will be served, thus making sure that the video loading won’t be slowed by serving data from a wrong region. We recommend using these when you have more regional than global traffic, though.
How To Fix Splash Images

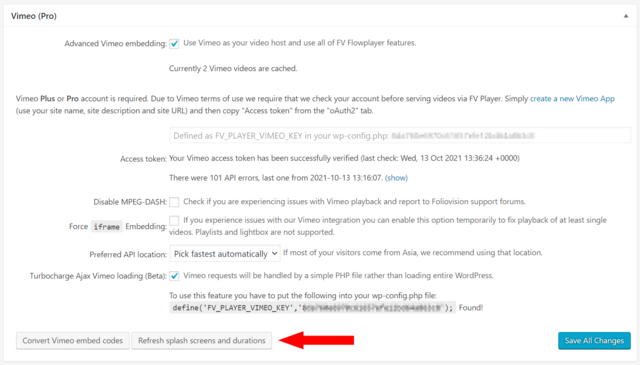
If you find yourself with these stripes in place of your splash images, there is no need to worry. It seems that Vimeo changed URLs for all splash screens. We have added a button that will purge the cached splash screen URLs and FV Player will then fetch the new ones automatically.
Go to Settings -> FV Player Pro -> Hosting -> Vimeo and click the Refresh splash screens and durations button.
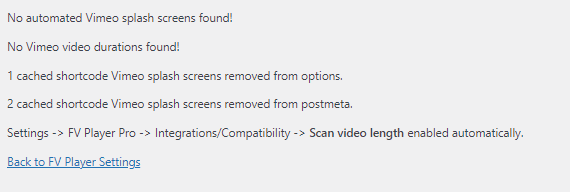
After refreshing, you will receive a summary message, informing you about results:
In order to fix Vimeo Splash Images, you have to be on FV Player Pro version 7.5.7.727 or above.
How To Convert Embed Codes
If you already have many Vimeo videos on your website, you do not need to change them manually.You can simply convert them in bulk. Here’s how:
1. Go to FV Player -> Settings -> Hosting -> Vimeo and click Convert Vimeo embed codes:
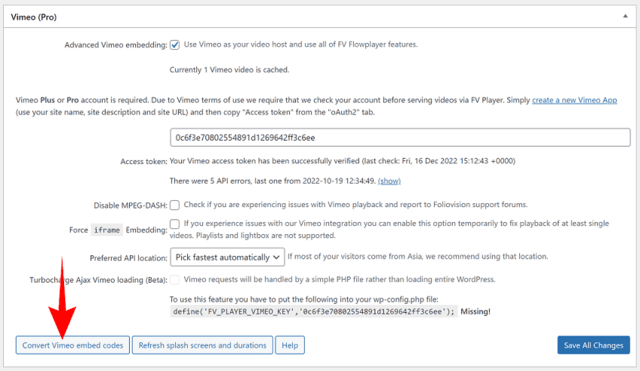
2. While unlikely, you may run into issues. We suggest you do a backup before proceeding. You should also get a notice warning you about this.
3. After the process is done, you will get a report, showing all the posts containing converted Vimeo embeds:

This process converts the classic Vimeo embed codes to full FV Player shortcodes:
[fvplayer id="723"]
You can convert the newly created shortcodes into the even shorter [fvplayer id=] database reference shortcodes.
Troubleshooting
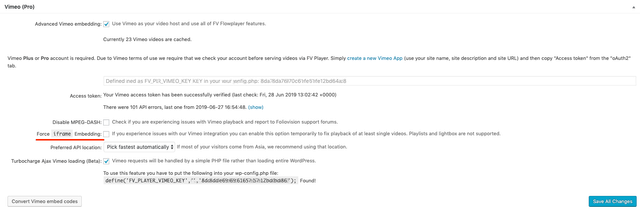
In case you experienced some issues regarding Vimeo video playback, you can disable the Advanced Vimeo embedding option in Settings > FV Player > Hosting > Vimeo (Pro). Click Save All Changes. From then on, Vimeo videos will be embedded via iframe instead of the full featured FV Player.
If you’re having issues with splash images, click here.
For playback issues, don’t forget to also check if your privacy settings are correct.



Leave a Reply