Update: Elastic Transcoder is old Amazon Web Service for video encoding which is replaced by the new MediaConvert. MediaConvert has a better pricing model, where you only pay for the encoding features which you are actually using and it supports all the new standards, such as 4K video.
List of contents:
- Setting up buckets in Amazon S3
- Creating an encryption key
- Creating a new Pipeline
- Creating a new transcoding job
- Creating a new CloudFront distribution
- Using the Encryption Key with FV Player
- Inserting the HLS stream to FV Player shortcode editor
- Securing the videos further
This guide is for setting up an HTTPS Live Streaming (HLS). Keep in mind that this protocol doesn’t necessarily require the CloudFront distribution (see our guide Serving Private Videos via CloudFront) and signed URLs used with S3 (see our guide Serving Private Videos with Amazon S3) will prevent it from working at all.
Setting up buckets in Amazon S3
-
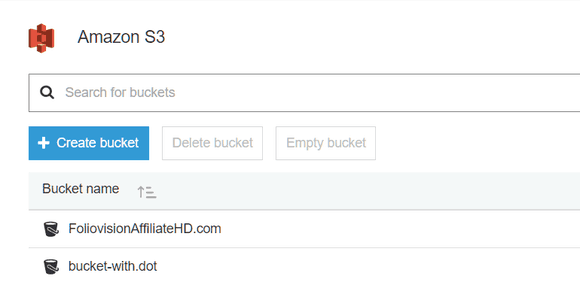
You will need 3 Amazon S3 buckets. It’s best if all of them are in the same region for optimal transcoding speed.
-
First bucket will contain your video files. Make sure you follow the Amazon S3 guide mentioned above from step 12 to the end, and skip any steps regarding the file protection – that means no signed URLs.
-
Second bucket will contain the resulting HLS stream. Make sure you setup CORS headers for according to our CORS guide for AWS.
- Third bucket will contain the HLS thumbnails. Just create an empty bucket.
-
Creating an encryption key
-
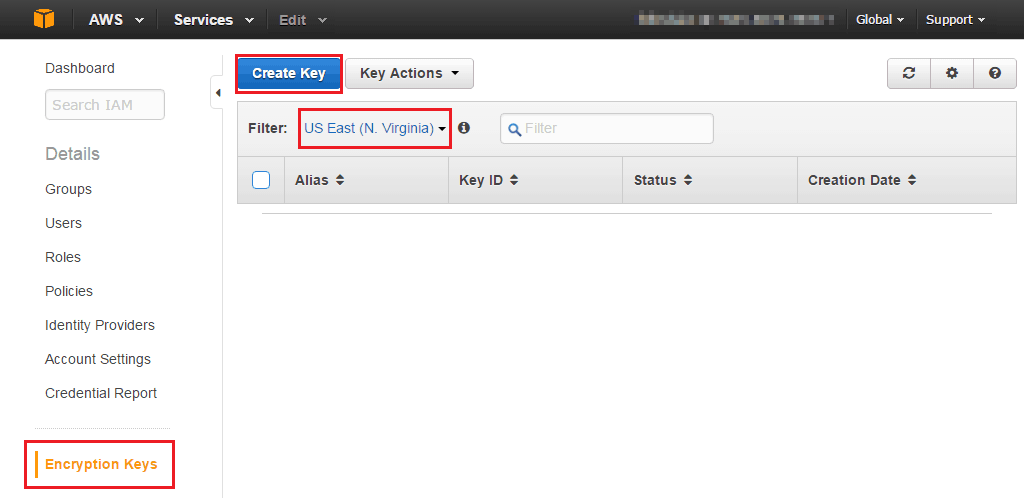
If you are setting up an encrypted HLS stream, go to the IAM (Identity & Access Management) console and create an encryption key. Make sure it’s in the same region as your S3 buckets.
 Give the key an alias.
Make sure you grant your user Administrative Permissions.

Once the key is created, you will be able to see it’s ARN (see in next steps).
Creating a new Pipeline
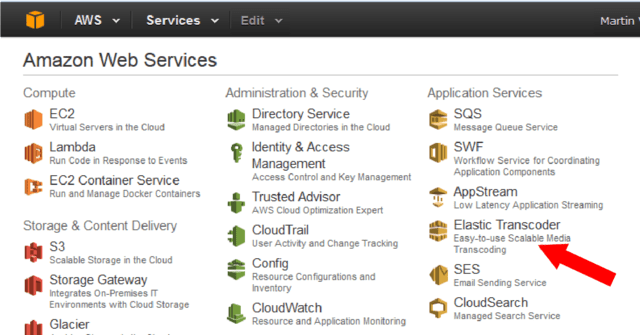
- Next, open Elastic Transcoder from the menu.

Elastic Transcoder in AWSmenu - Click on Create a new Pipeline. Pay attention to what area you have selected, just check what is next to your name in the top right corner of the screen.

Creating a new Transcoder Pipeline -
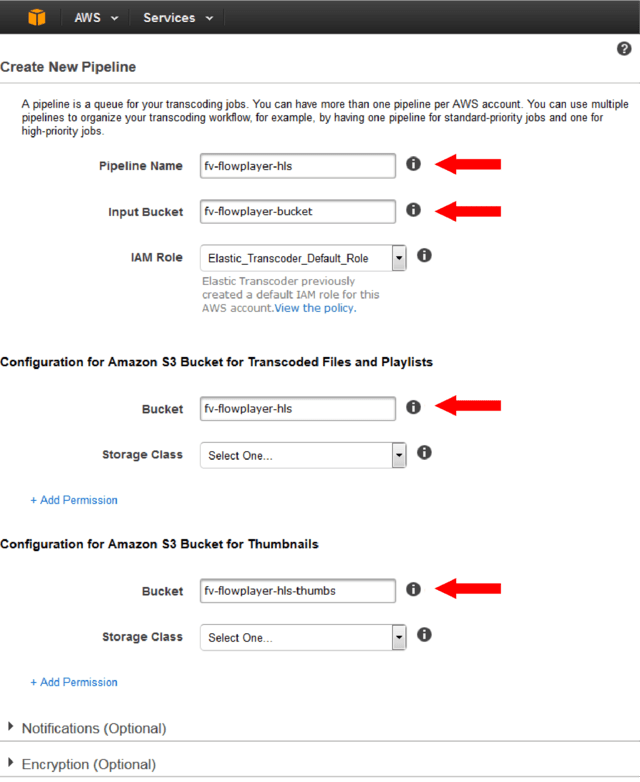
Enter the pipeline name and select your S3 buckets (as described in step 1.).

Selecting the S3 buckets for the HLS stream -
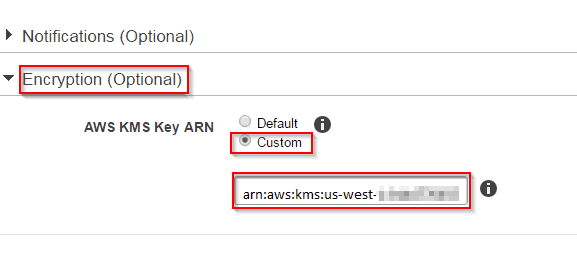
To add encryption, go back to IAM > Encryption keys, open your key, copy the whole ARN and paste it into the Encryption section.

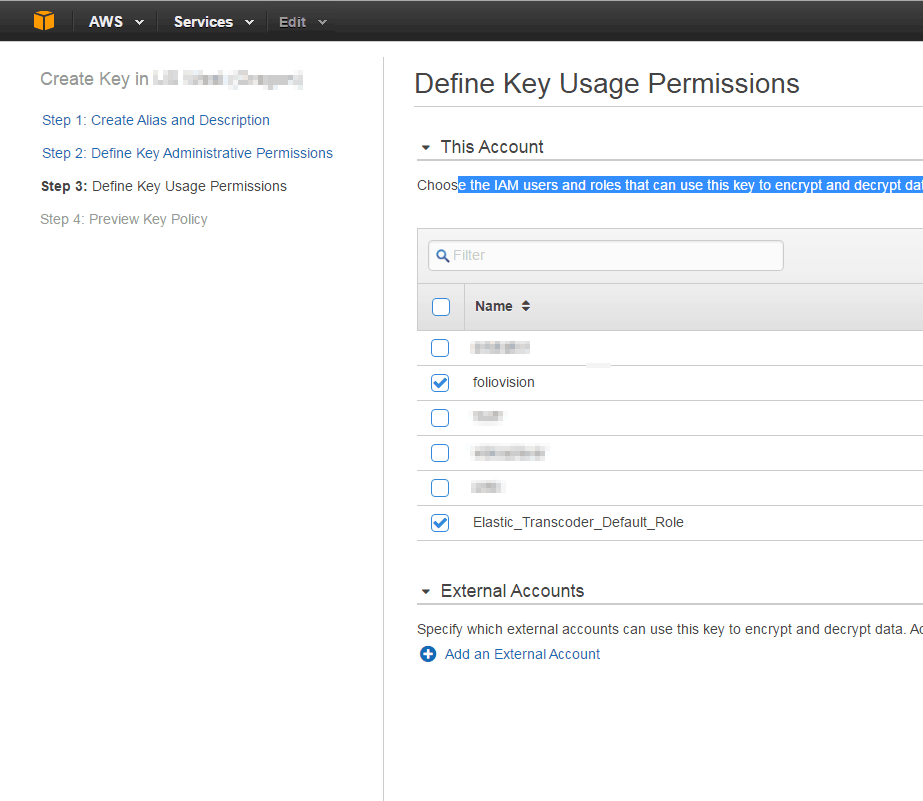
Also make sure you grant Usage Permissions for the encryption key to Elastic_Transcoder_Default_Role. To do that, go back to the IAM screen.
 Granting usage permission to the encryption key
Creating a new transcoding job
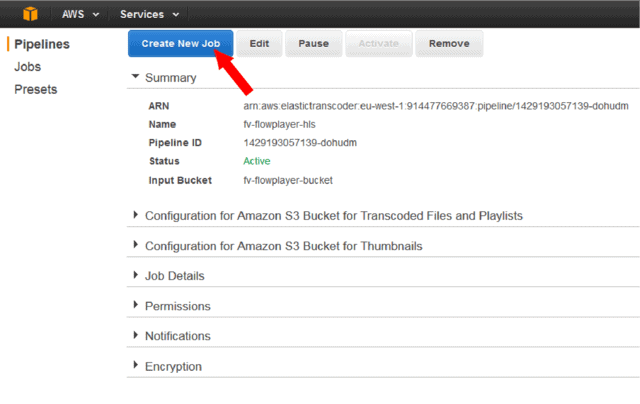
- Once the pipeline is properly set up, create your transcoding job.

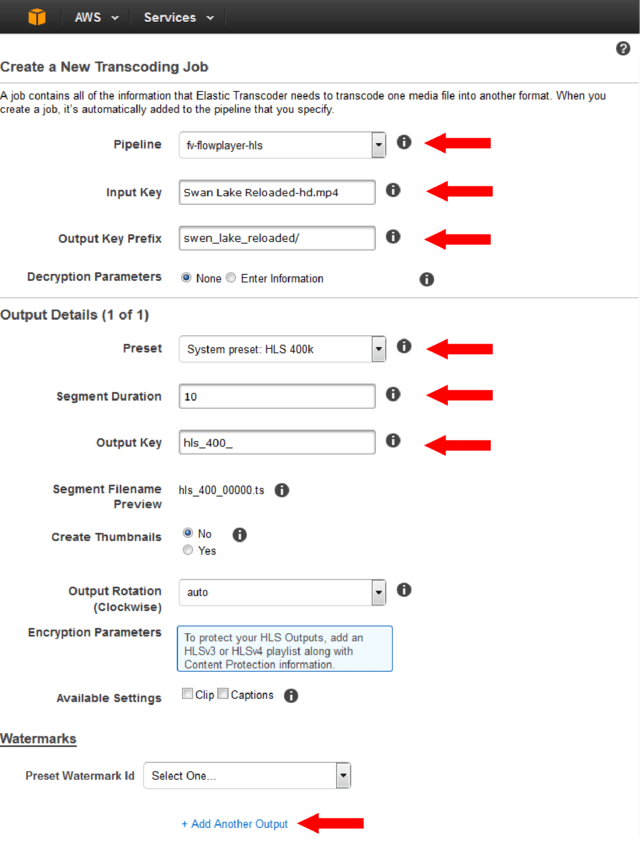
Creating a new transcoding jobYou need to pick the pipeline for the job, the video to encode (Input Key) and enter the Output Key Prefix (should be unique, use the video file name as in our example below).
In Output Detail, pick the preset, enter its Output Key and Segment duration – 10. Then click Add Another Output to add another quality setting. The preset and output keys to enter are:

Entering the HLS streams- System preset: HLS 400k, Output Key: hls_400_
- this preset uses baseline profile with level 3, 400×288 pixel video – suitable for mobile
- System preset: HLS 1M, Output Key: hls_1000_
- this preset uses main profile with level 3.1, 640×432 pixel video with 872 kbit/s bitrate – good preset do SD video
- System preset: HLS 2M, Output Key: hls_2000_
- this preset uses baseline profile with level 3.1, 1280×720 pixel video with 2400 kbit/s bitrate – good preset do HD video
- System preset: HLS 400k, Output Key: hls_400_
-
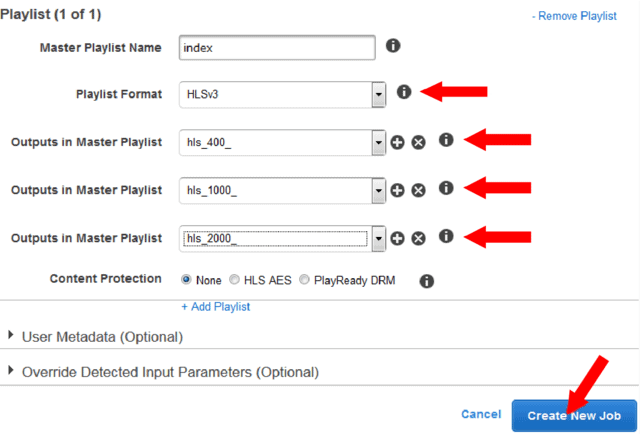
Next you need to enter the playlist (adaptive streaming) settings – scroll down to Playlists (Adaptive Streaming) and hit Add Playlist. This links all the HLS streams into the adaptive stream.
The Master Playlist Name will be the actual name of your m3u8 file. In the example we use “index“, but you can use whatever name you want. We recommend using hyphens to separate words, for instance “my-first-lesson“.

Creating adaptive streaming -
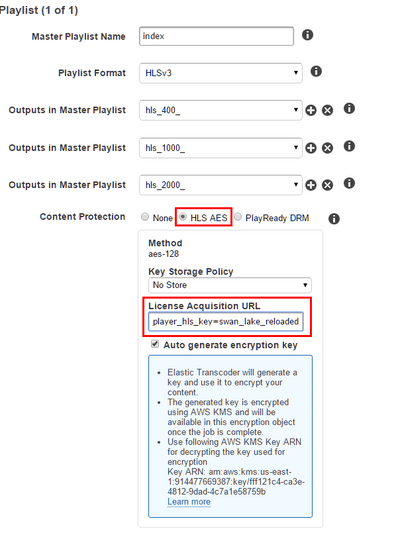
If you want encrypted HLS stream, make sure you select HLS AES before proceeding with the above step. A dialog box will popup where you need to select Key Storage Policy > No Store and enter your License Acquisition URL. It needs to be like:
https://your-site.com/?fv_player_hls_key={Output Key Prefix from step 7.}/{Master Playlist Name} – in our example it will be https://foliovision.com/?fv_player_hls_key=swan_lake_reloaded/index

Note: If you are using a WordPress Multisite, you always have to specify the path to the correct site in your network. The code will therefore be:
https://your-site.com/sitename/?fv_player_hls_key={Output Key Prefix from step 7.}/{Master Playlist Name}
As you can see it’s bound to the website where you will post your video. So if you want to test your video on a dev site, you need to create a separate transcoding job.
Keep in mind that this encypted HLS will only be allowed to play on your site and nowhere else, so make sure you set this right. We strongly recommend using https:// although http:// would work as well.
-
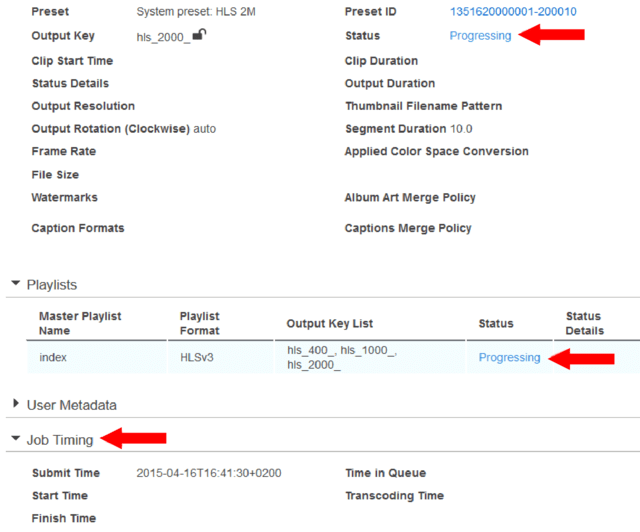
Click Create New Job and wait until the video finishes processing. You will see a screen with a lot of information, the Job Timing will tell you when it will be done. Our sample video only took a couple of seconds to finish.

Transcoding job in progressIf you want to copy a job to preserve the settings of the transcoding and apply them to a different video, don’t forget to o replace the Input Key, Output Key Prefix, the Licence Acquisition URL and to check the box ‘Auto generate encryption key’. Keep in mind that if you make a mistake, you will again have to change the Output Key Prefix and also the License Acquisition URL so a new folder can be created in the output bucket in S3.
Creating a new CloudFront distribution
-
Once it’s done, you can see that your S3 bucket has a new folder in it (the Output Key Prefix) and that it contains the index.m3u8 file. However the permissions are locked. That’s not a problem since to stream the video efficiently you need to create a CDN CloudFront HTTP distribution for your S3 bucket.
- Follow our guide here and set it up for your new HLS S3 bucket: Setup a CloudFront HTTP distribution for your video. Keep in mind that you should not use the “Restrict Viewer Access” option (signed URLs won’t work with HLS stream), but you will need to check the “Restrict Bucket Access” along with the “Grant Read Permissions on Bucket“. That also means updating the bucket policy.
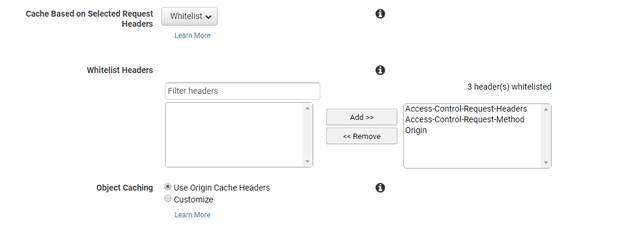
You also need to allow CORS in your S3 bucket with HLS streams and then in CloudFront distribution set the Cache Based on Selected Request Headers to Whitelist and add all three possible options in the table that will appear below.
This is a part of the process required for activating the HLS.js in FV Player. More information about it can be found in this guide - Using HLS With FV Player.
Using the Encryption Key with FV Player
-
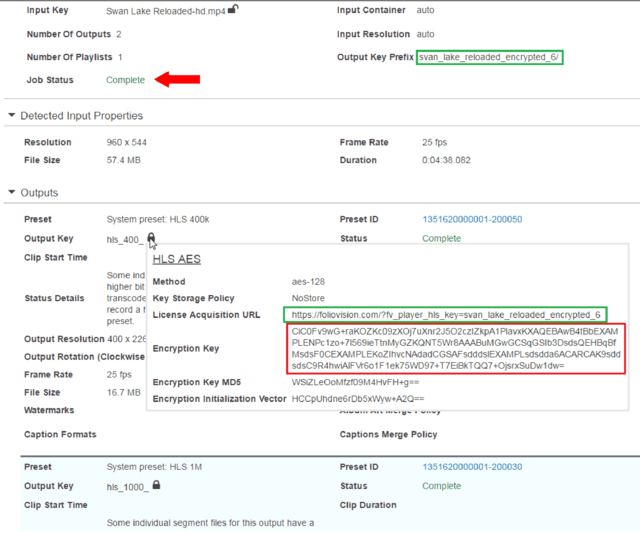
If you are setting up an encrypted HLS stream, make sure you check the job details once it’s finished and go to Outputs -> Output Key -> lock icon. Once you hover it, you will be allowed to copy the Encryption Key.

The Encryption Key in outputs tabThe problem is you need to decode the Encryption key, so here are the steps which you need to do only once:
-
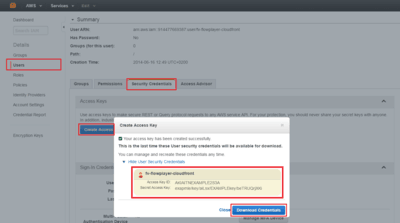
In IAM Management Console, select the same user that you have picked for the Encryption Key in point 5. and create a new Access Key. Make sure you safely store these credentials.
 Obtaining access keys
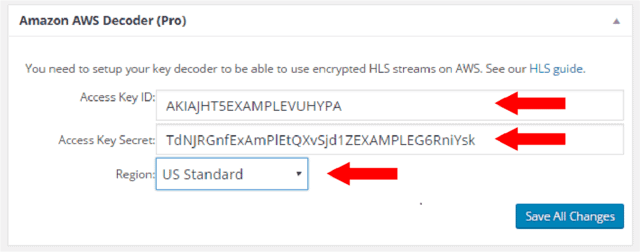
Put these keys into Settings -> FV Player Pro -> Amazon AWS Decoder (Pro) and also pick the region where you created your Elastic Transcoder Pipeline.

Amazon AWS Decoder (Pro) tab in FV Player’s settings
Inserting the HLS stream to FV Player shortcode editor
-
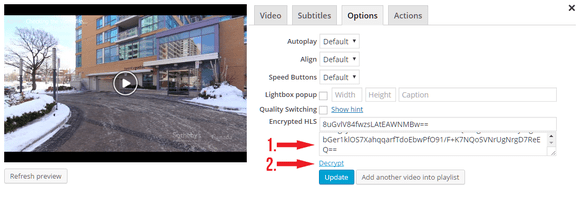
Then you can copy the Encryption Key from your job details into the Encryption HLS field in FV Player’s shortcode editor (1.) and click the Decrypt link (2.) to get the required decryption key. It will be stored in the shortcode. Make sure you have switched FV Player Pro to Beta to get this feature.
 Encrypted HLS in FV Player’s shortcode editor
 -
Once that is done, you can access your HLS like this:
http://your-cloudfront-id.cloudfront.net/the-output-key-prefix/index.m3u8
If the HLS is encrypted, it will request the decryption key from the URL setup in step 8. The decryption key is only handed out to active visitors of your website.
Using AWS WAF & Shield to protect against download tools and hotlinking
If you HLS is not already encrypted, AWS WAF allows you to prevent video hotlinking (other websites using your videos in their articles) and also prevents use of some of the automated video download tools which users can install into their browsers as extensions.
We do recommend also using these steps for your already encrypted HLS streams, as it is another layer of protection. It helps with MP4 files too, although the download tools will likely still succeed for these files.
Unfortunately our video checker will fail on these videos, but as long as you encoded the videos with AWS Elastic Transcoder using the right preset, there will be no issues.
-
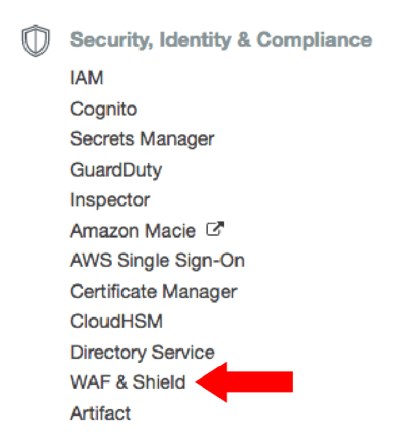
Open the “Services” menu and pick “WAF & Shield”.

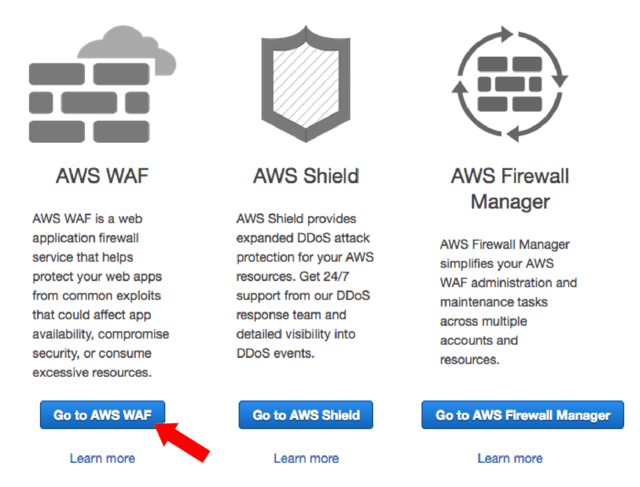
You will get to a intro screen, where you need to pick “Go to AWS WAF”.
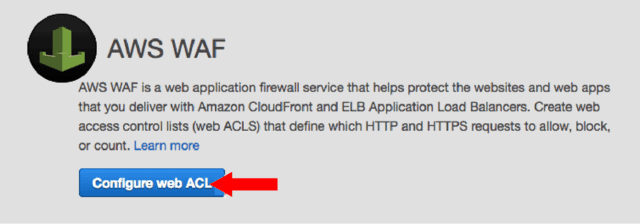
- On the next screen, pick “Configure web ACL”. You will get a new “Concepts overview”, just click “Next” to get to the next step.
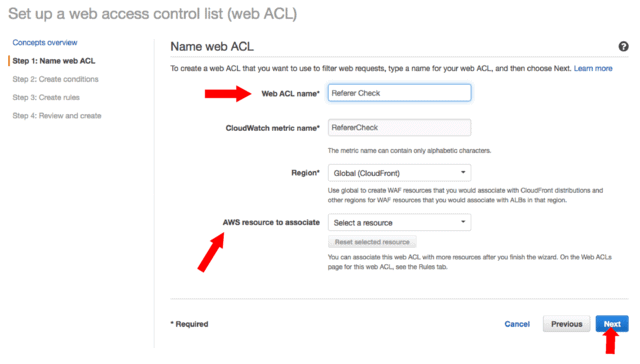
- Here you need to name your ACL and pick the AWS resource to associate it with – you need to select the CloudFront distribution which you are going to protect.
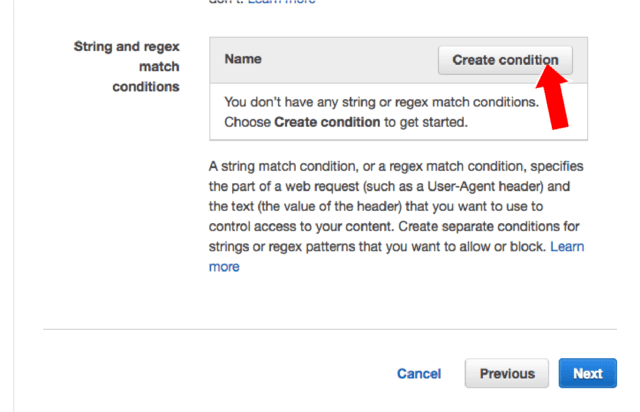
- On the next screen, you can see different conditions which you can created. Just pick “String and regex match conditions”. You will get a new popup dialog.
-
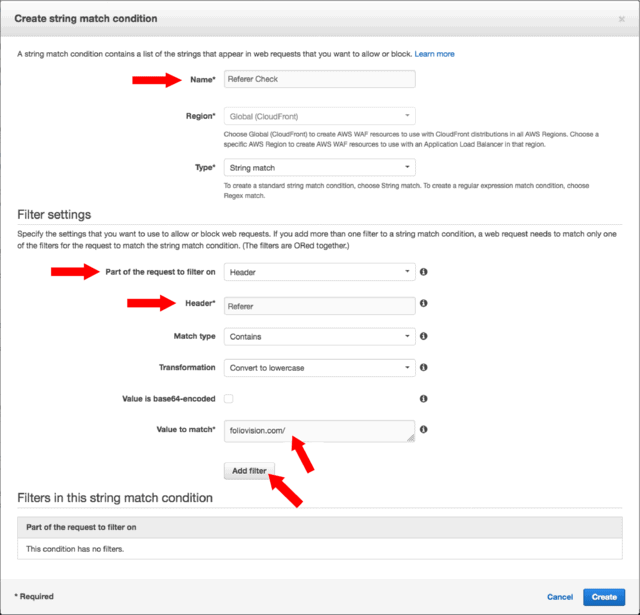
In the new popup dialog you need to enter the Name, pick “Header” for “Part of the request to filter on”, enter the “Referer” for the “Header*” field and finally put your website domain into the “Value to match*” field. We recommend putting in the slash symbol too.

Creating a string match conditionDon’t forget to click “Add filter” since without it, the condition will not be valid. Then just click “Create”. The dialog will close and you will have to click “Next” to move forward.
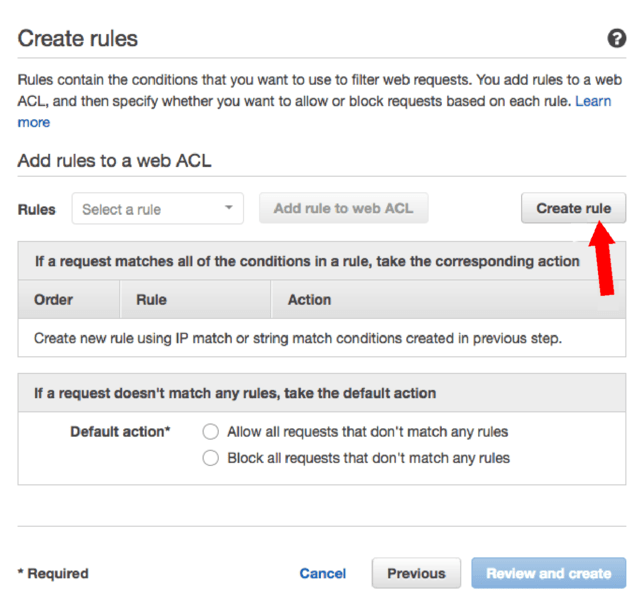
- Next you have to create the Rule that will use the condition which you just created. Hit the “Create rule” button. You will get another popup dialog.
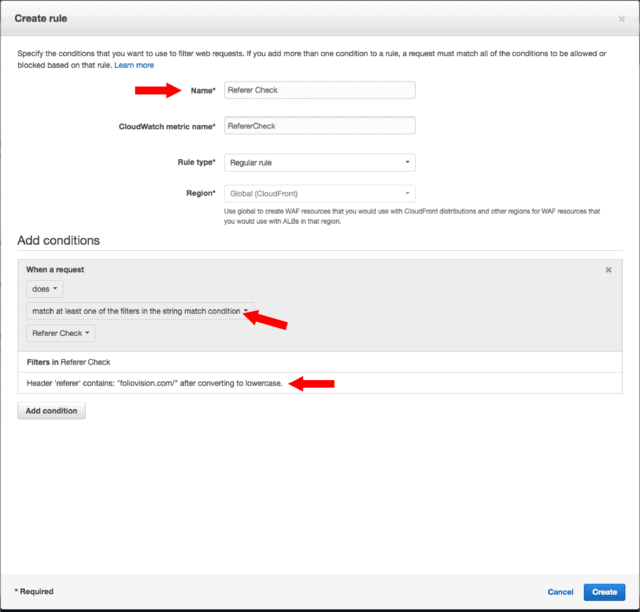
- In this dialog, you have to provide some name again. Select “match at least one of the filters in the string match condition” and then pick the condition which you created. Once selected, it needs to show up as “Header ‘referer’ contains: “{YOUR DOMAIN} .com/” after converting to lowercase.” Then you can confirm the rule.
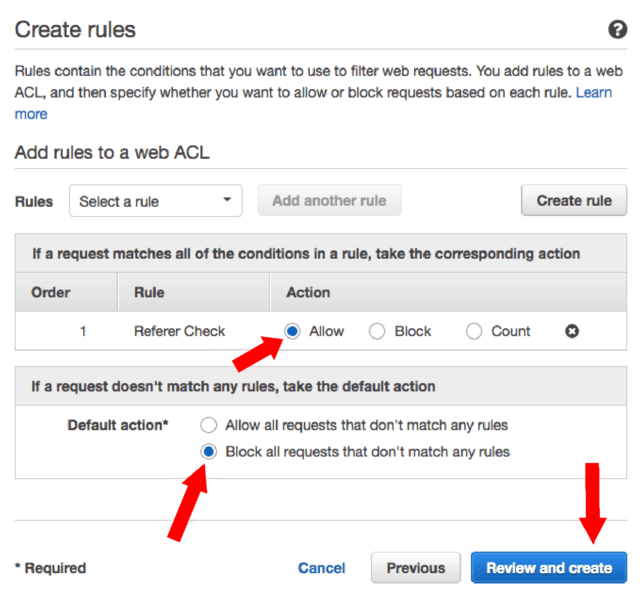
- You will see that the rule has been appended, pick “Allow” as it’s Action and “Block all requests that don’t match any rules ” for the “Default action*”.
-
Next create a new condition and a rule like this
Header 'user-agent' contains: "android" after converting to lowercase.This rule is important to retain HLS playback on Android.
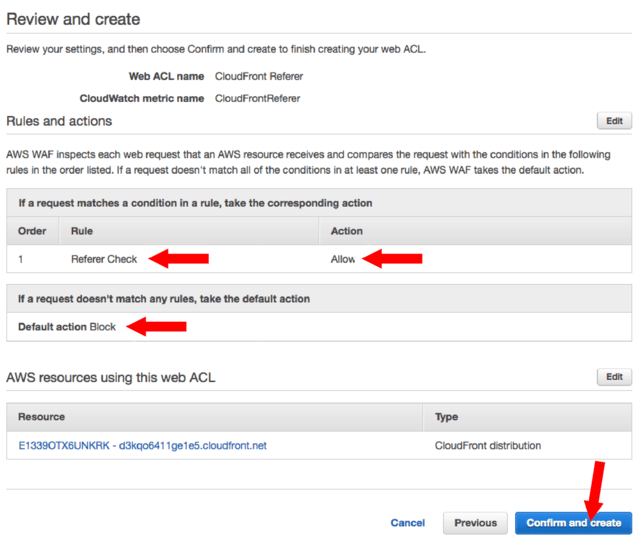
- Then just click for the next step where you will see an overview of the new rule. Don’t forget to click “Confirm and create”.
- You should see the results almost instantly, it doesn’t require the CloudFront to redeploy. You can try using your favorite video download tool, or simply try to open the video link in a new browser tab.
- You can also apply the same rule to other CloudFront distributions too. Simply use the “Add association button”.




Leave a Reply