CloudFront is a CDN (content delivery network). With its 127 edge locations across the Globe, it makes sure that your videos are quick to buffer anywhere. It is very scalable from small to large businesses, and offers easy pay as you go pricing, while it also provides a certain degree of download protection.
Before you can serve your files using CloudFront:
- your files must be hosted on Amazon S3 bucket. Make sure you follow this guide Serving Private Videos with Amazon S3.
- make sure you have the latest FV Player Pro version (our pro module for FV Player. Purchase a license)
This article shows you how to:
- Setup a CloudFront HTTP distribution for your video
- Summary
- Using Your Own CloudFront Domain
- Embedding Videos To Your Posts
- Summary – Practical example
Setting up CloudFront HTTP distribution
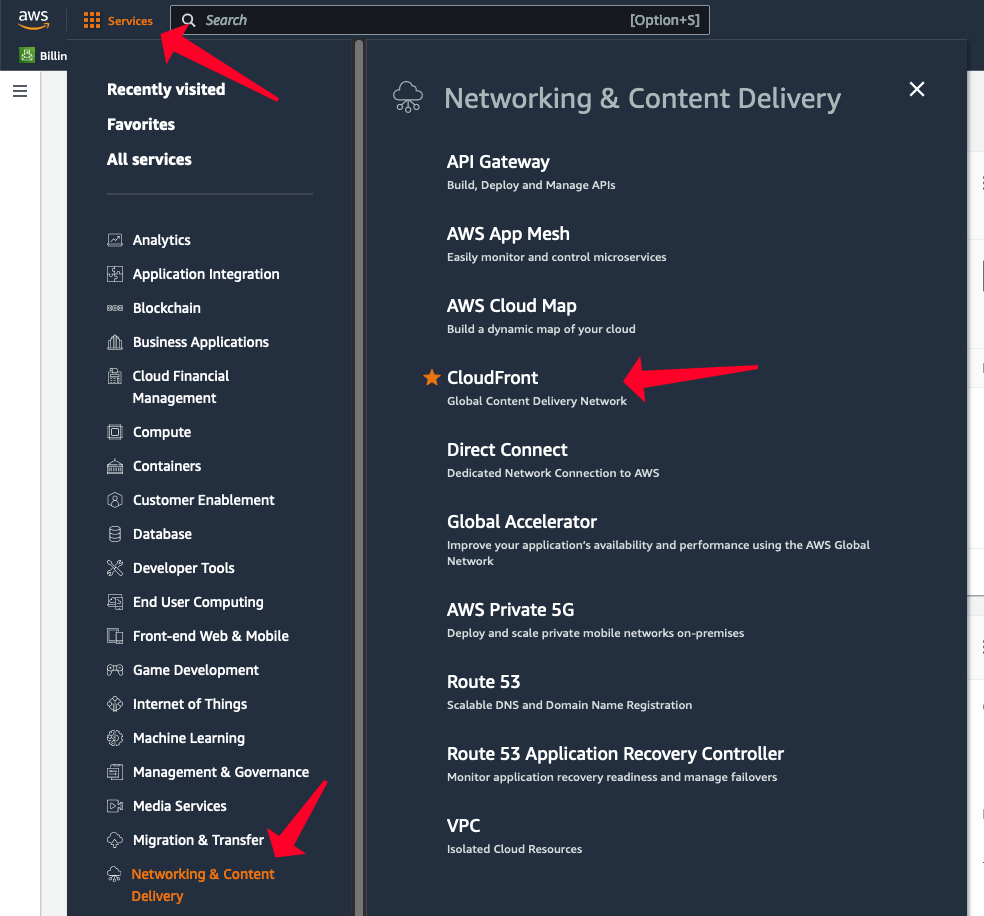
- Go to console.aws.amazon.com and access CloudFront in Services -> Networking & Content Delivery -> CloudFront.
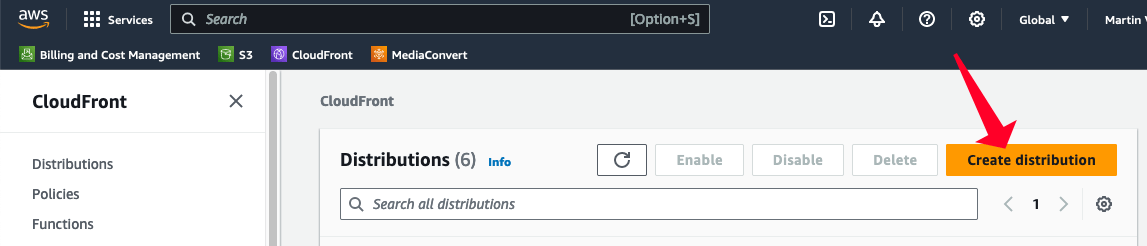
- Click the button to “Create distribution”.
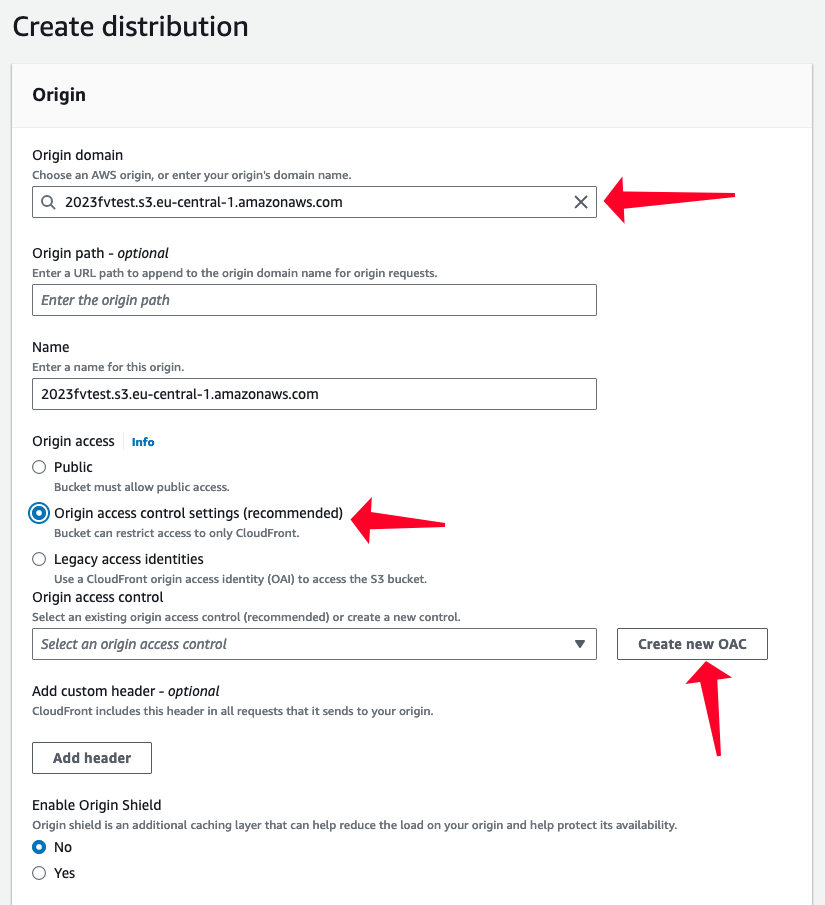
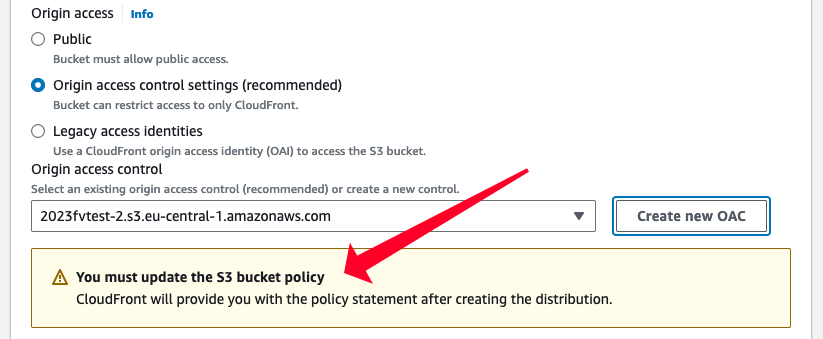
- Pick your S3 bucket as the “Origin domain”, select “Origin access control settings” for “Origin access” and click to “Create new OAC”.
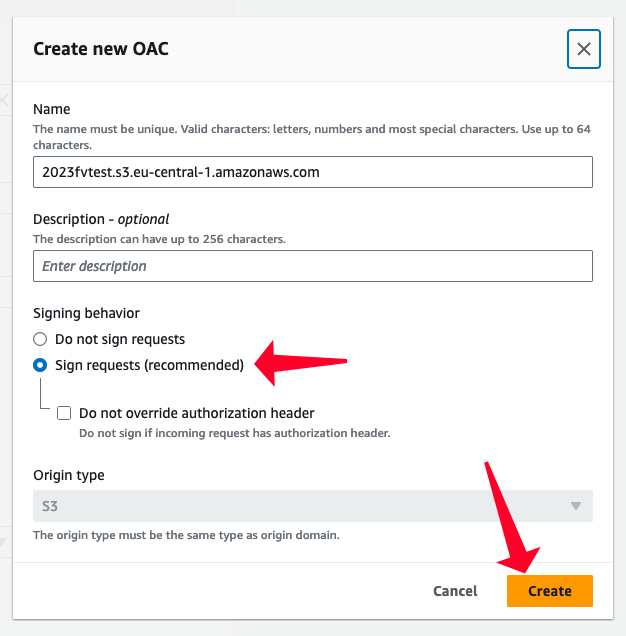
- In the “Create new OAC” dialog select “Sign requests” for “Signing behavior” and click “Create”.
- You will get a notice about the S3 bucket policy, which is very important:
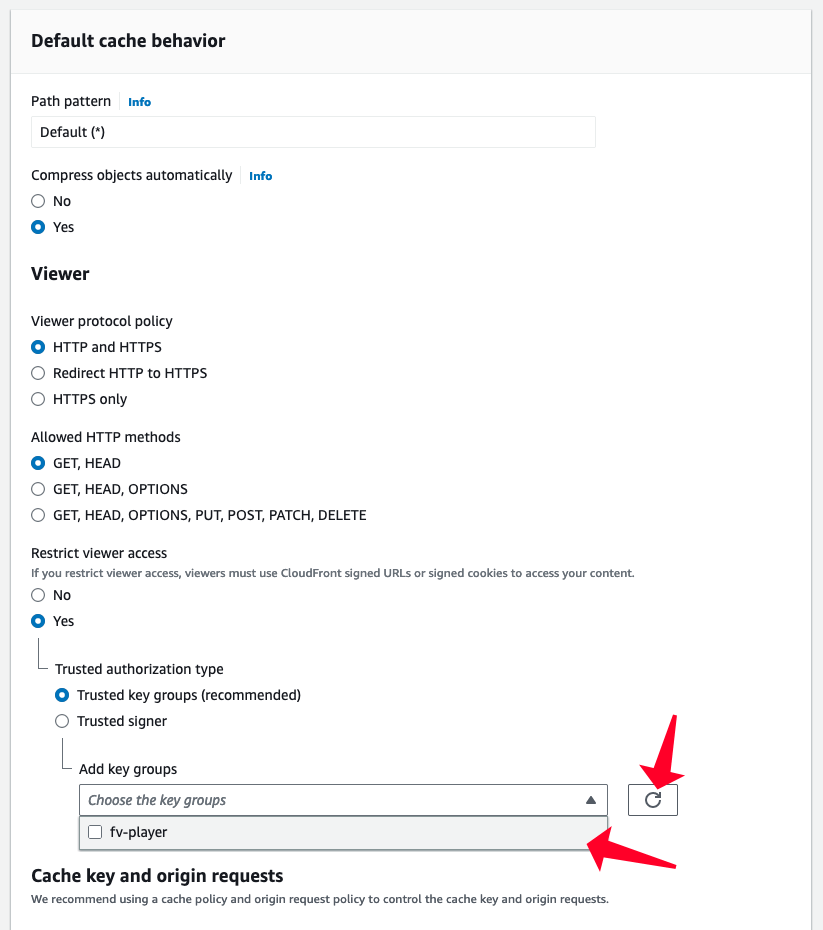
- Scroll further down to the “Default cache behavior” section. Here you need to set “Yes” for “Restrict viewer access” if you want to prevent video file sharing and make it harder to download.
Also set “Trusted authorization type” to “Trusted key groups” and click to “Create key group”.
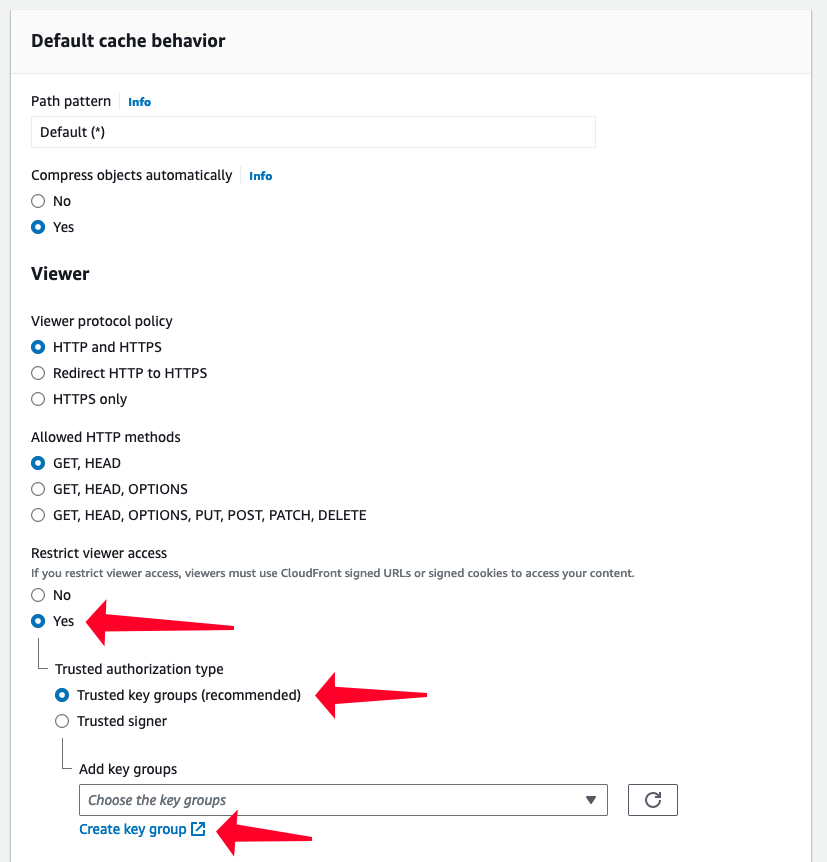
If video protection is not important, then continue with step 15.
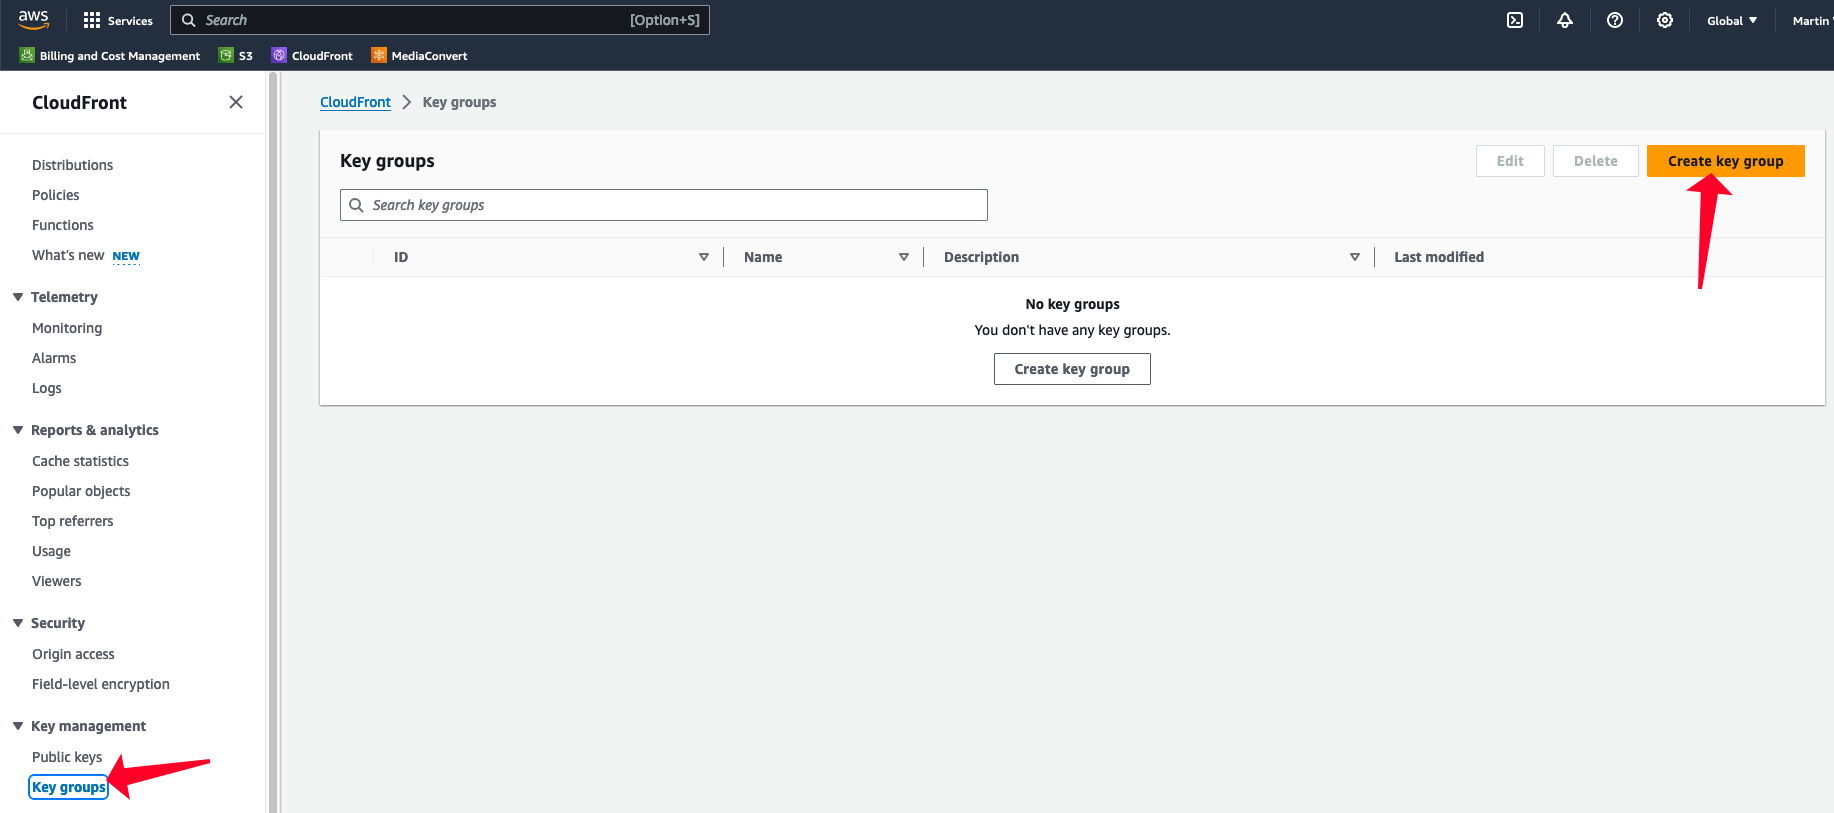
- You will get to a “Create key group” dialog where you actually need to take a step back and click “Key groups”.
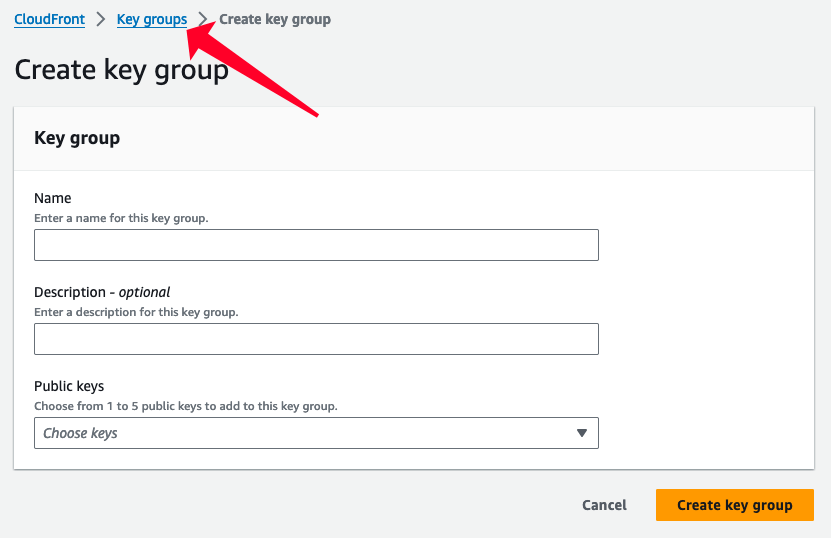
- We need to create the public key.
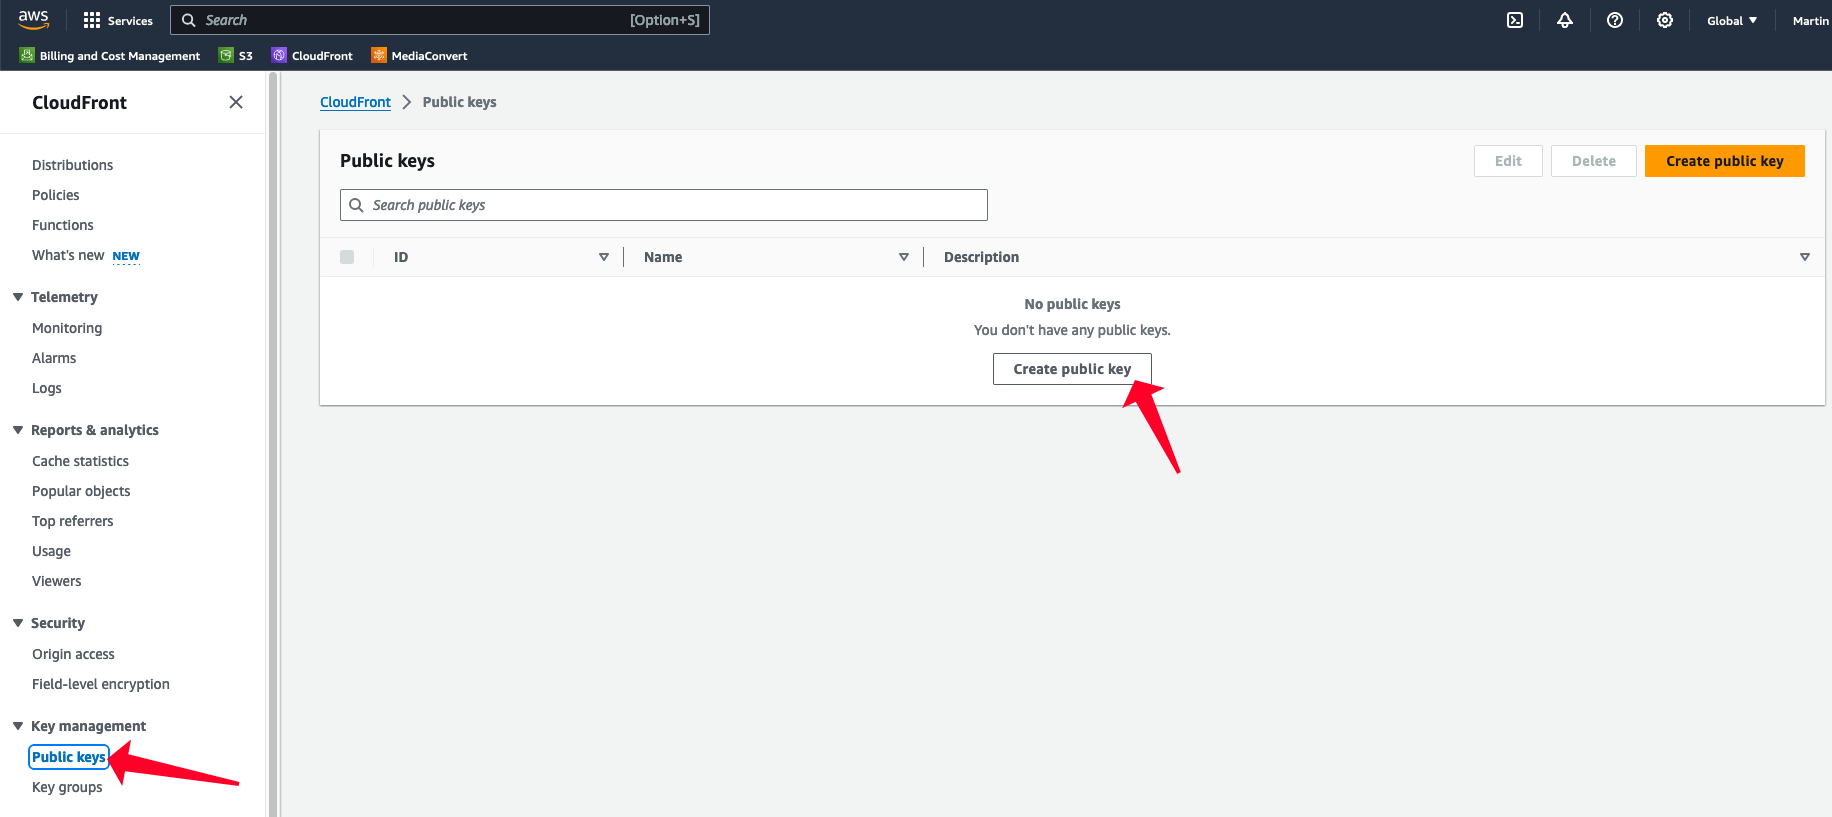
- The public key needs a name and the public key value.
You can use an online RSA key generator such as travistidwell.com/jsencrypt/demo/ or use command line OpenSSL tool:
openssl genrsa -out key.pem
openssl rsa -pubout -in key.pem -out pubkey.pem
But it’s safe to use the online tool as the resulting public and private keys are of no use, as the website owners have no idea where you are actually going to use the keys which they created.
Put the public key into the field:
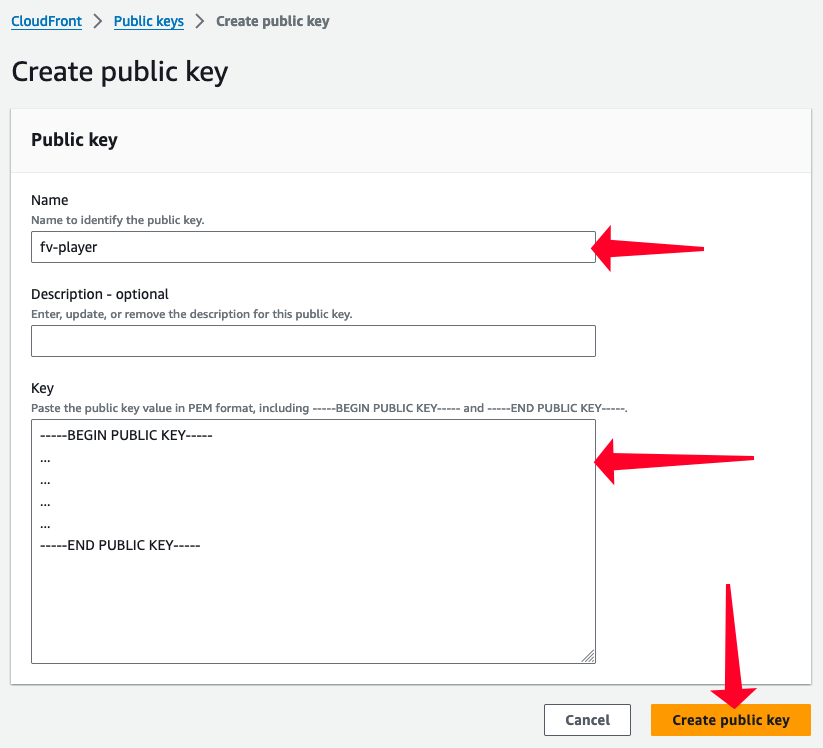
We will need the private key later, save it.
- Once the key is created, copy its ID:
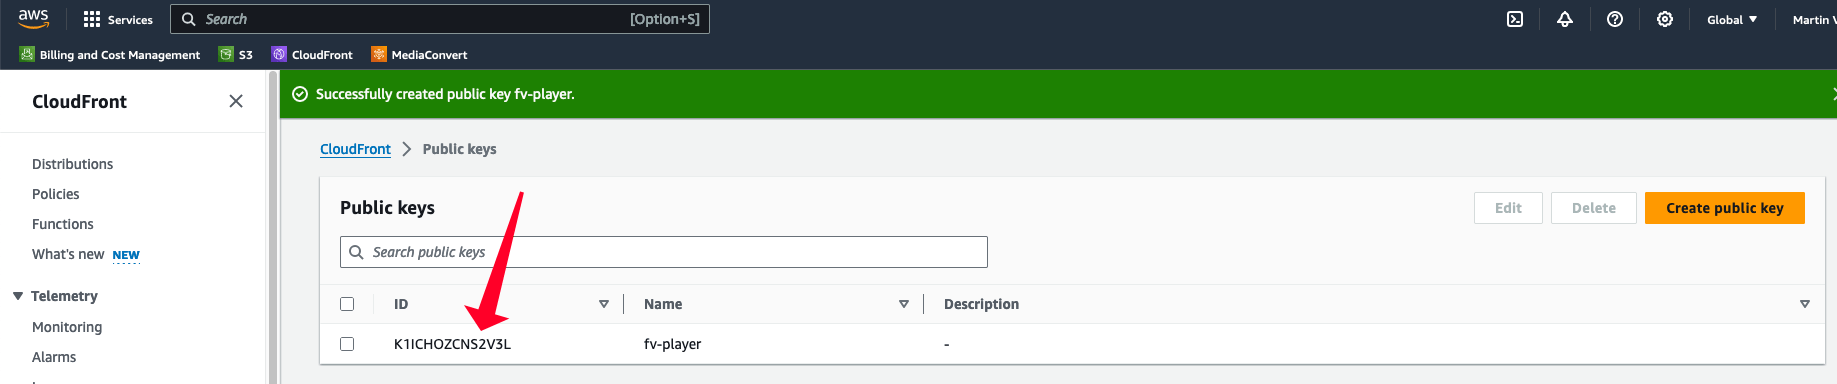
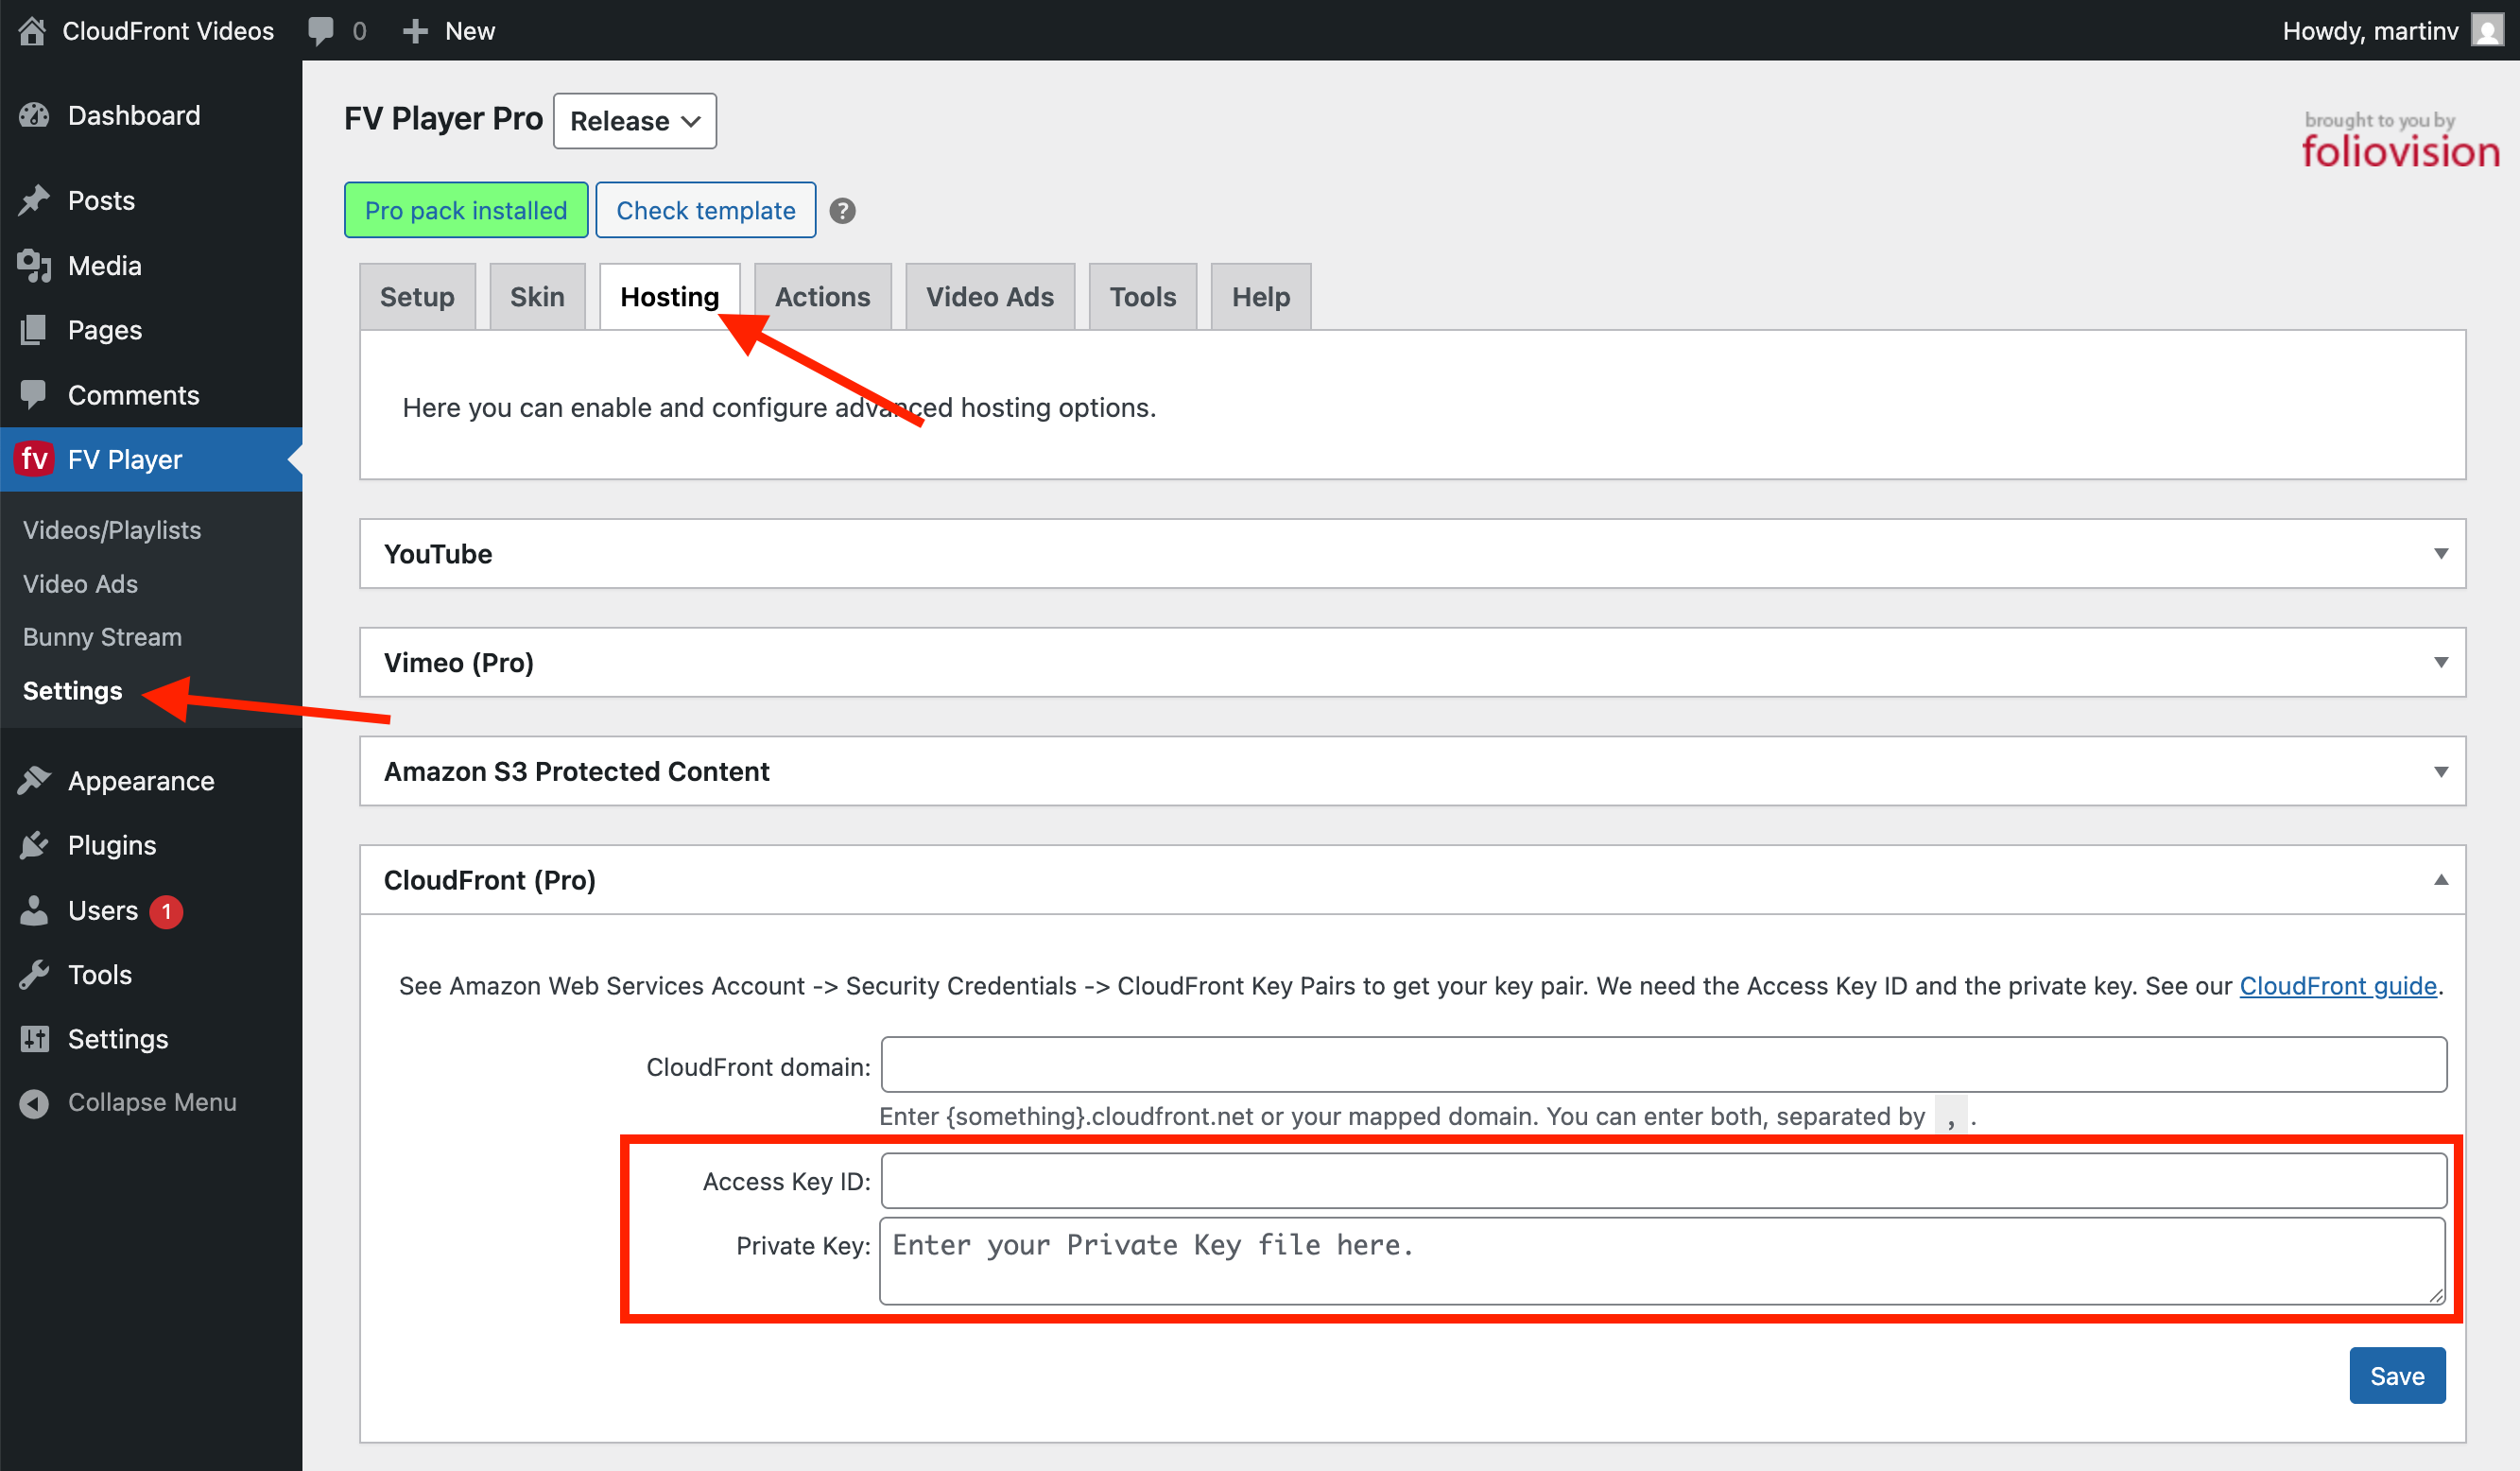
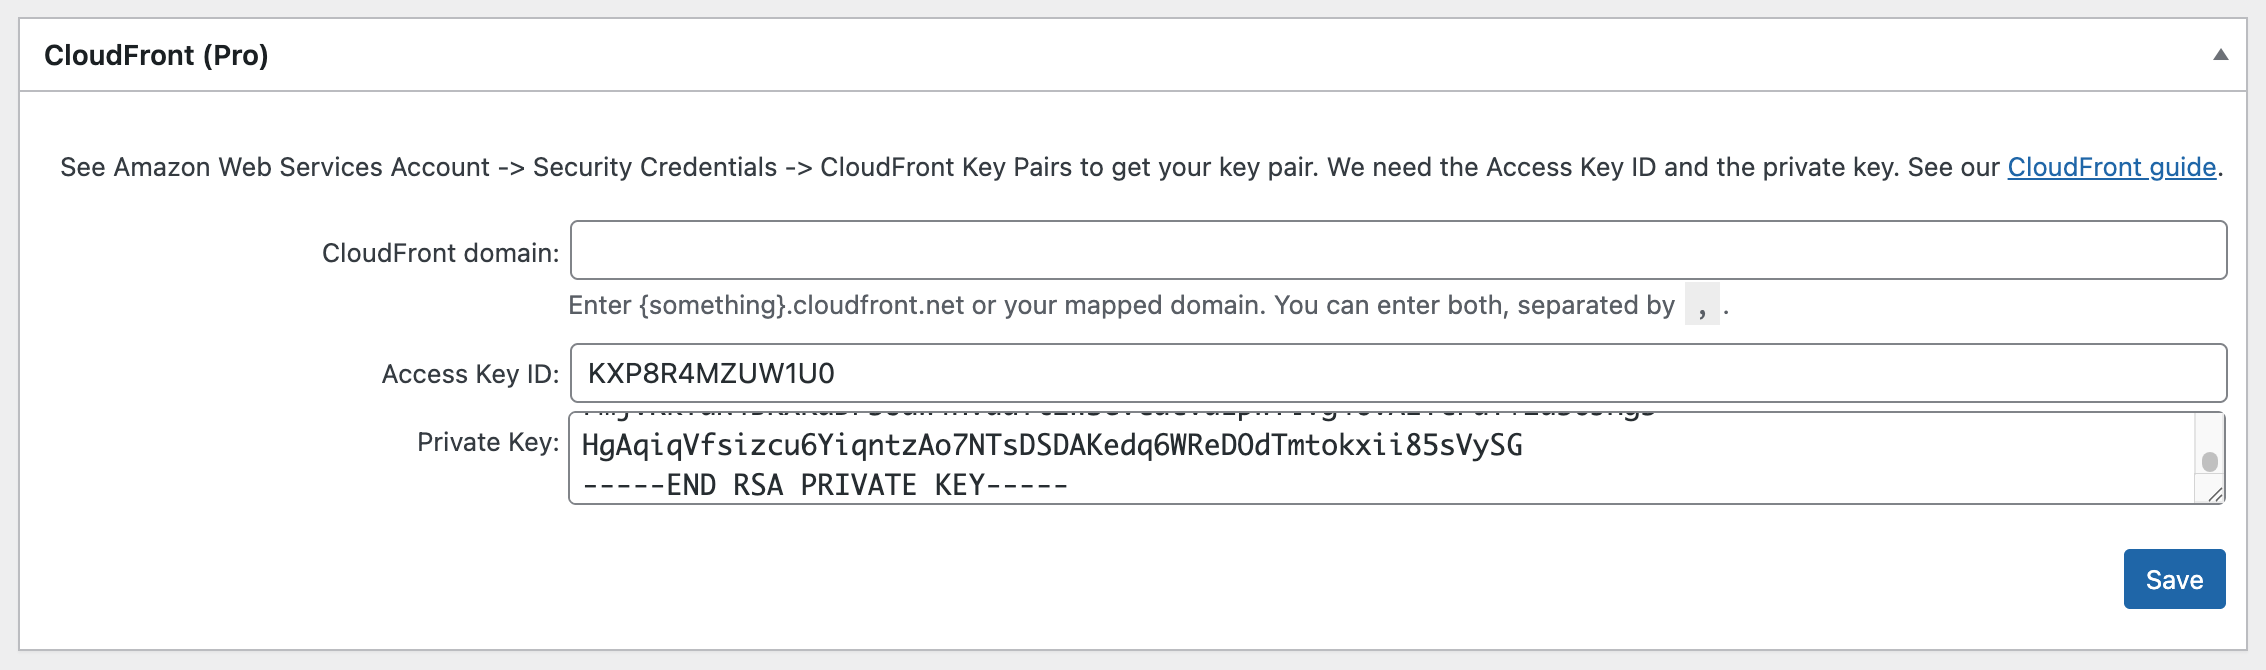
- Now store the key ID and private key in FV Player Pro settings.
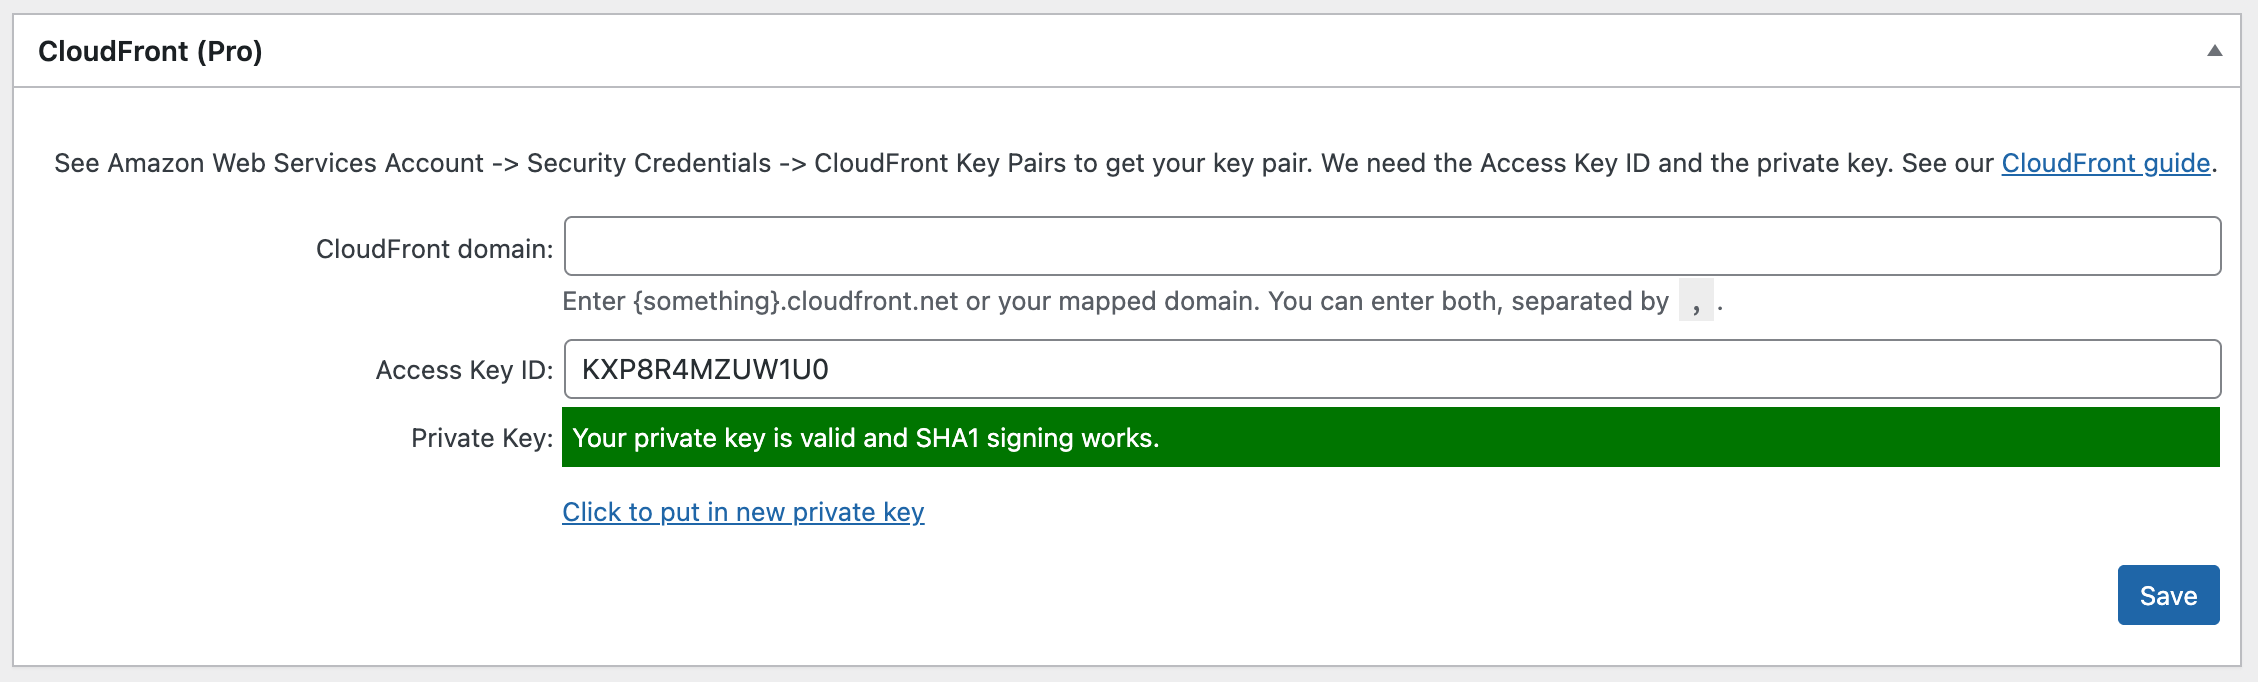
Note: We recently heard of few cases where the SHA1 cypher would not work. Please contact your web hosting technical support to ensure OpenSSL supports SHA1 signing as it’s required by CloudFront.
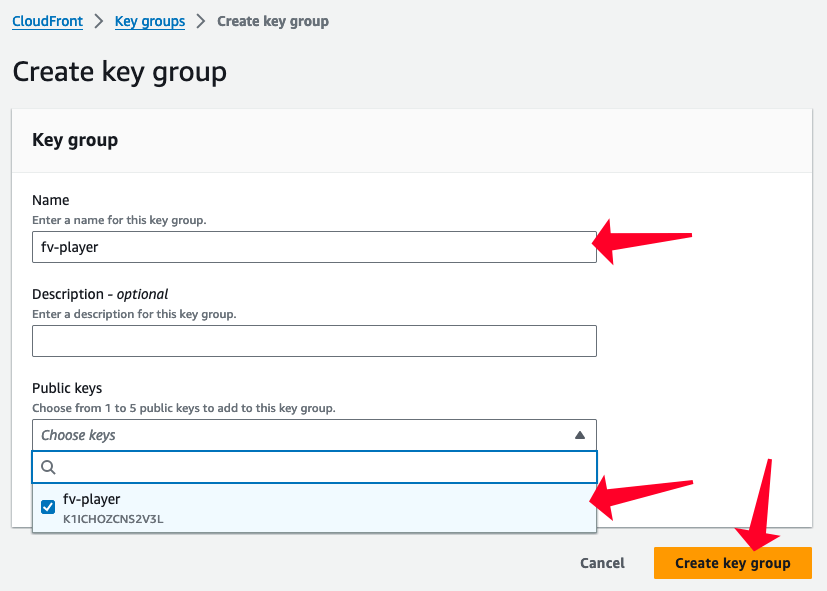
- Next create the Key Group:
- In the “Create key group” dialog pick the name, the public key and click to Create.
- Finally pick the key group for the CloudFlare distribution:
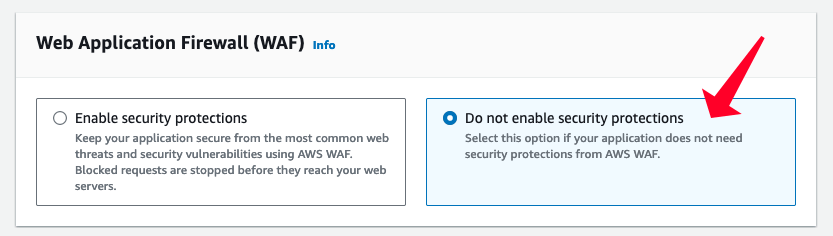
- For Web Application Firewall (WAF) select “Do not enable security protections”.
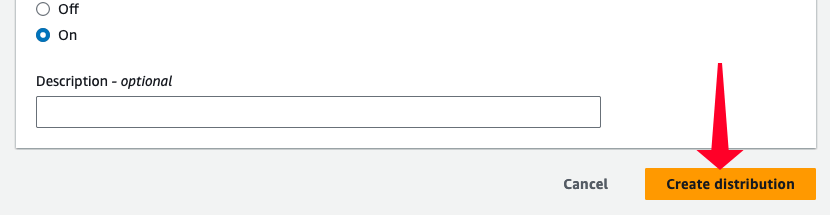
- And click “Create distribution” at the bottom of the page.
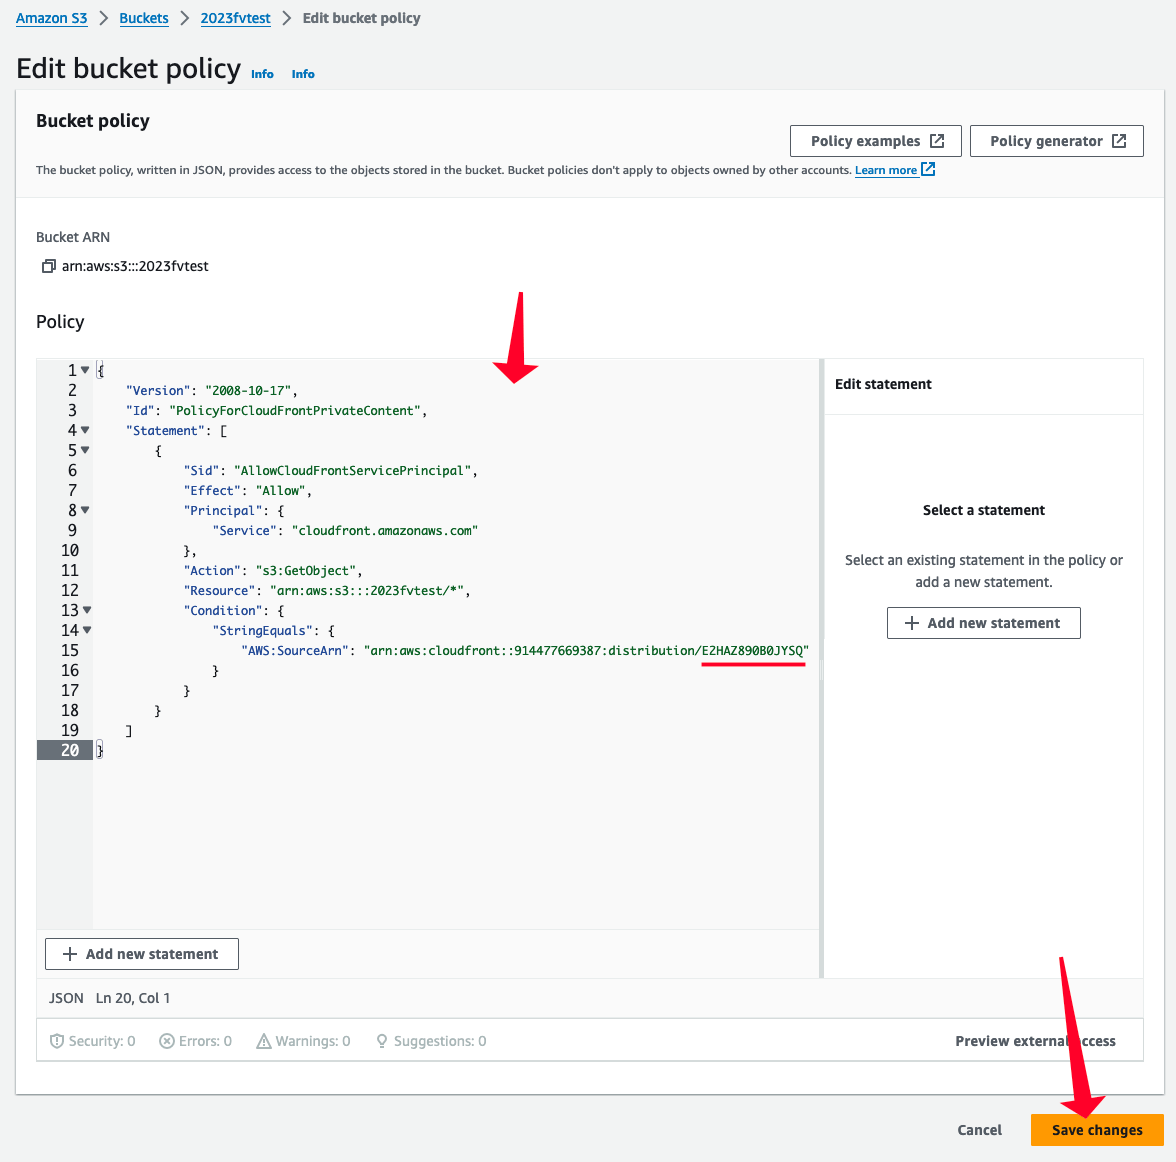
- You will get a message about the S3 bucket policy. Use the button to copy the policy and then click the link to go to the right place:
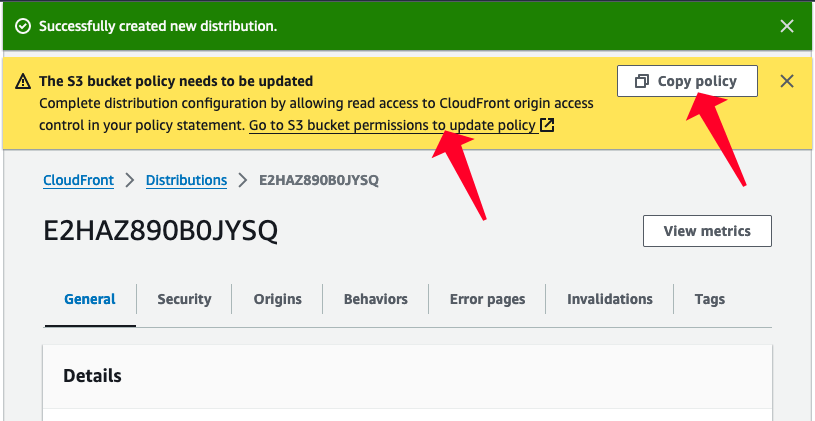
- Clicking the link will take you to your your S3 Bucket, go to Permissions tab.
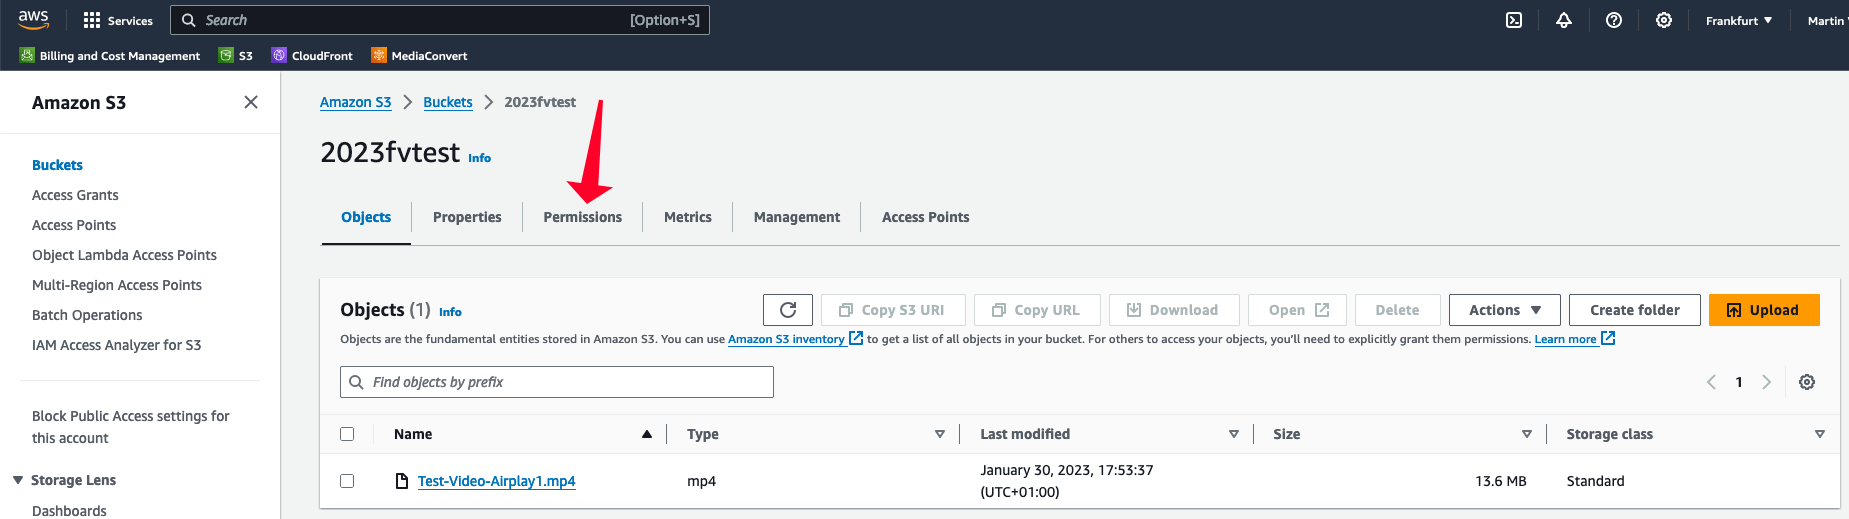
- In the Permissions tab scroll down to Bucket policy and click “Edit”.
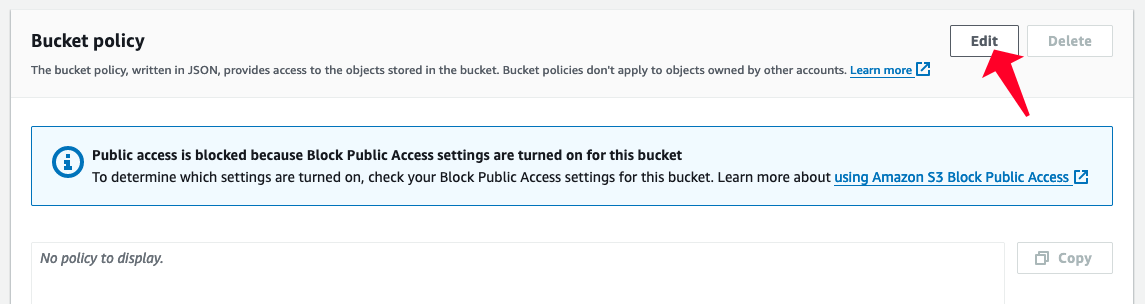
- Paste in the policy copied in step 17. and save.
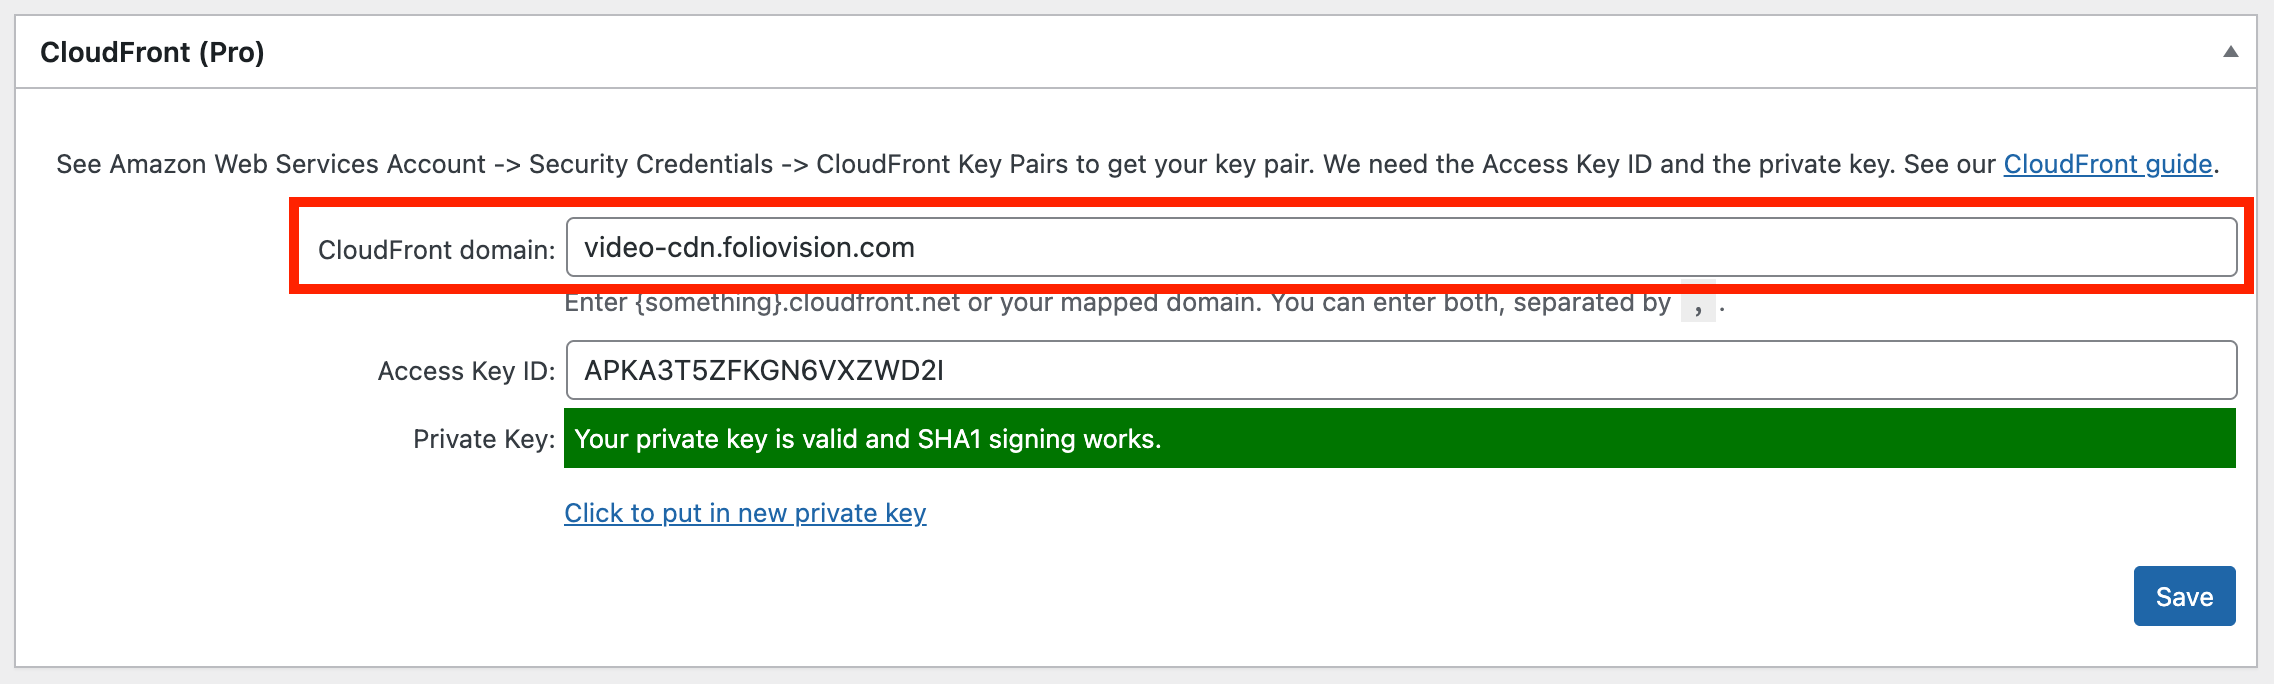
- You also need to copy your CloudFront domain and store it in FV Player Pro settings.
- Now if you go to your WordPress website where you have configured the S3 Bucket and the Cloudfront distribution you can pick the video and you will notice it uses te CloudFront domain automatically:
- Make sure you configure the CORS headers if you are going to use the HLS streaming format: How to enable CORS headers for Cloudfront
Using Your Own Domain Name
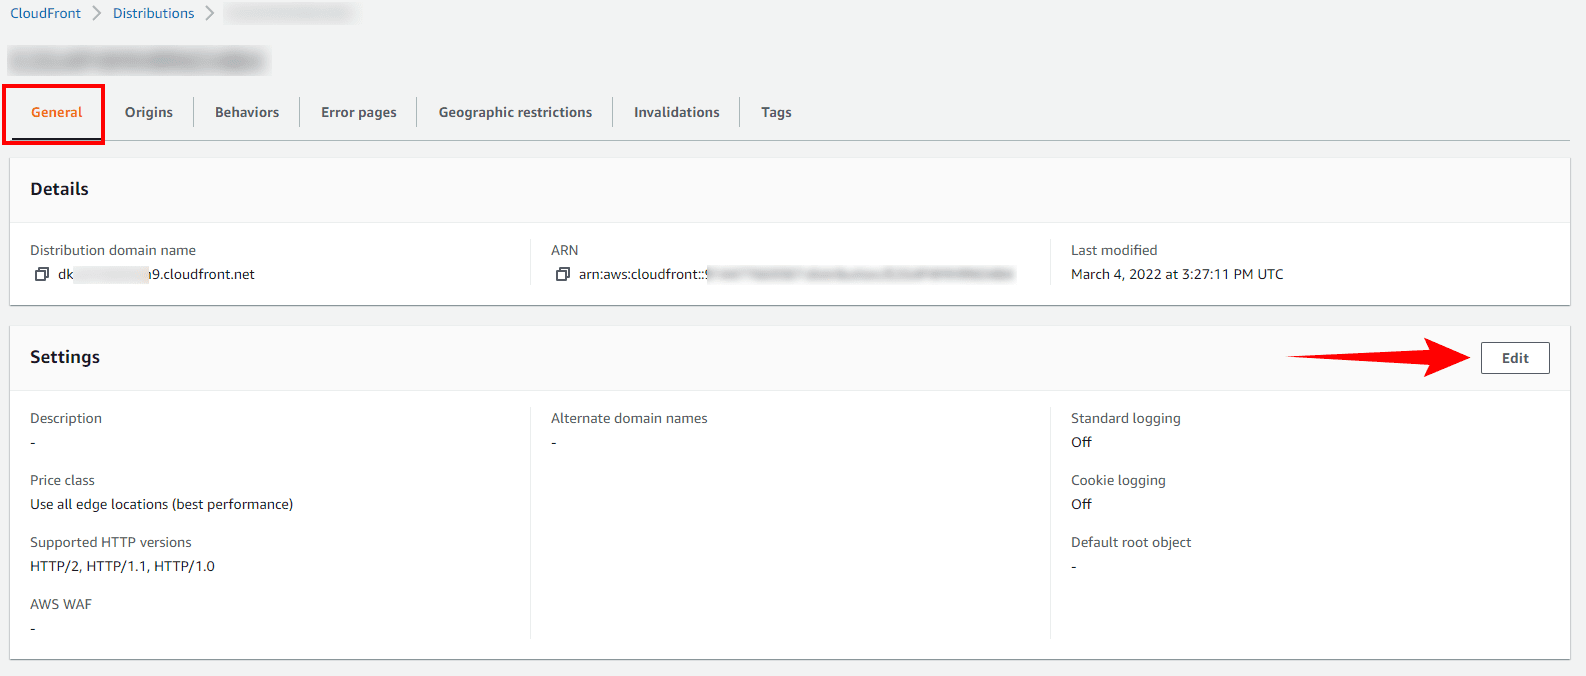
If you want to use your own domain name for the CloudFront, you have to go back to the distribution settings and edit the General properties
- Select the General tab, then click Edit.

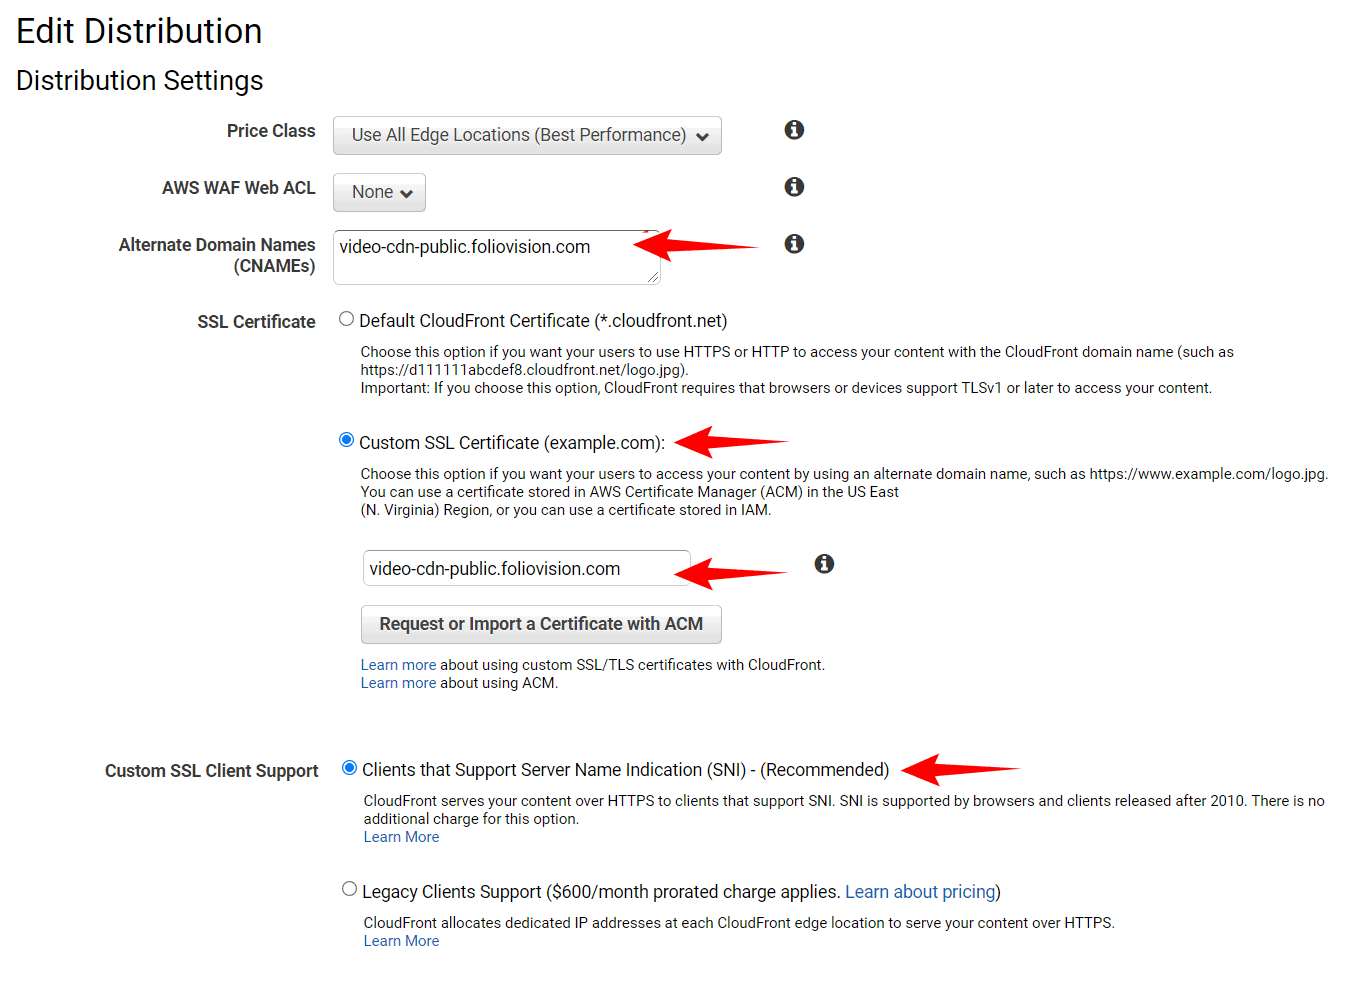
- Now you can enter your domain which you will point to your CloudFront domain (use C Name record in your DNS Zone).
 You will also need to enable the SSL – pick “Custom SSL Certificate” and enter your domain name. Hit the “Request or Import a Certificate with ACM” and you will get a new wizard, in which you need to enter that domain and use either DNS or Email validation. We recommend using the DNS validation.
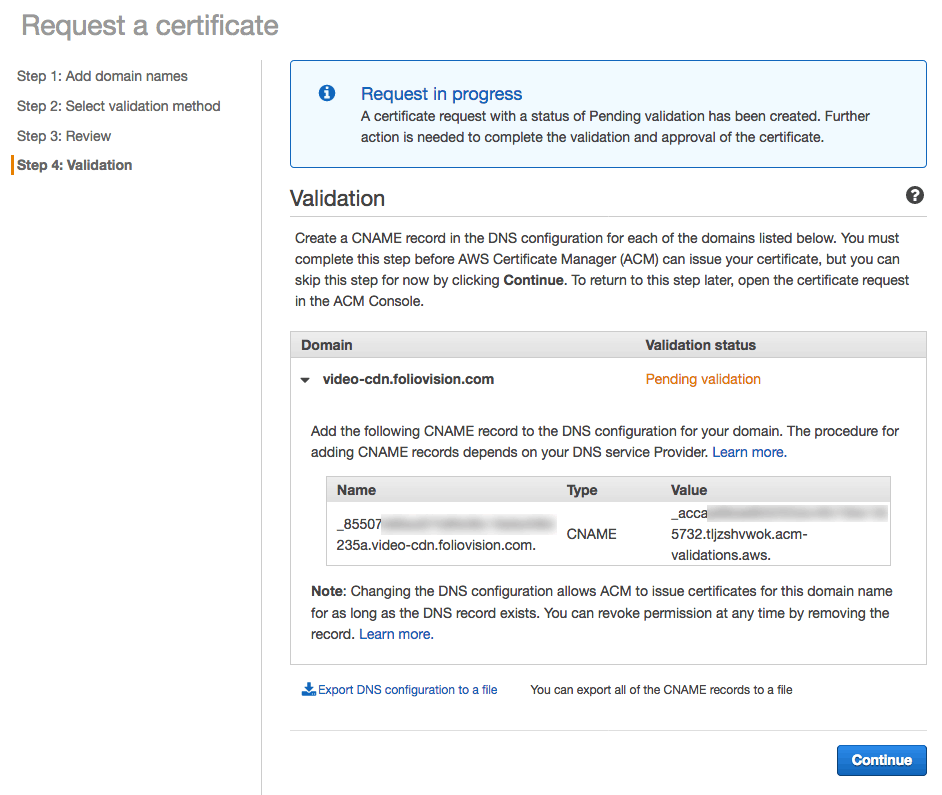
Be careful about the record value – it has to end with a dot symbol. Otherwise, your domain name might be appended to it.
Once the certificate is validated, you might need to start over with the custom domain setup. For “Custom SSL Client Support” pick “Only Clients that Support Server Name Indication (SNI)” as that option is sufficient. The changes will take a bit of time to save. Once done, you will be able to open your files using your own domain. Domain validation in ACM
Embedding Videos To Your Posts
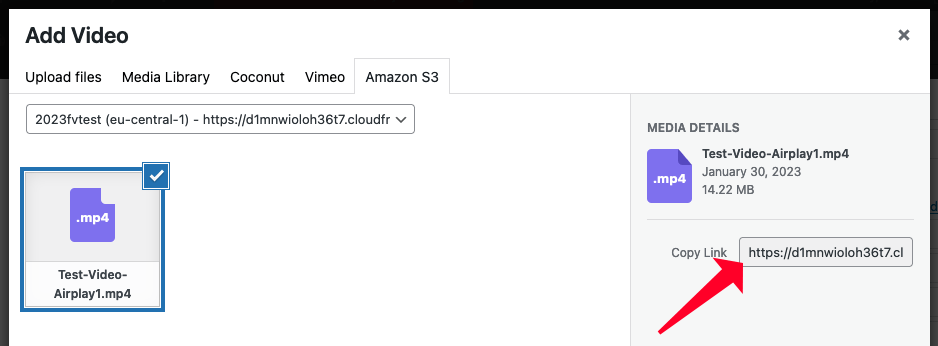
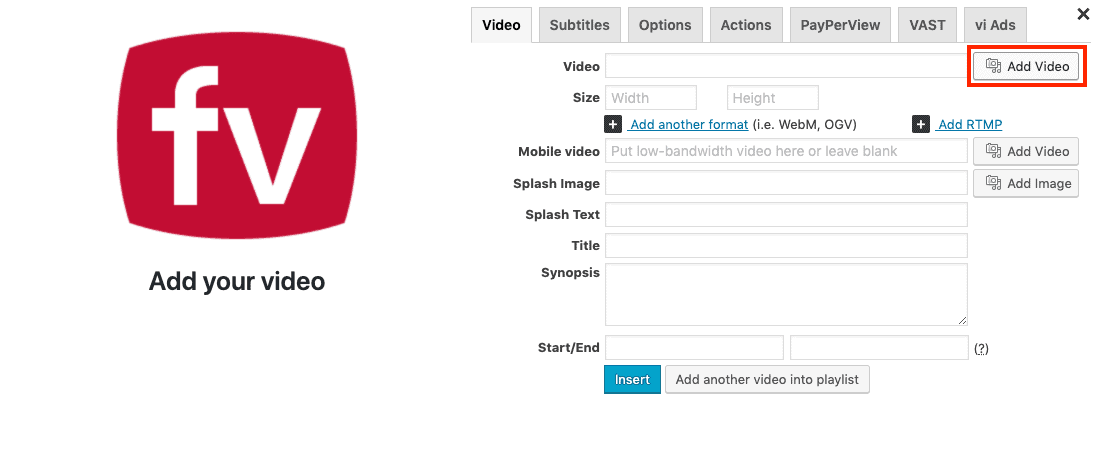
Now you can embed your videos. To avoid having to input your links manually, make sure to enable the S3 browser.
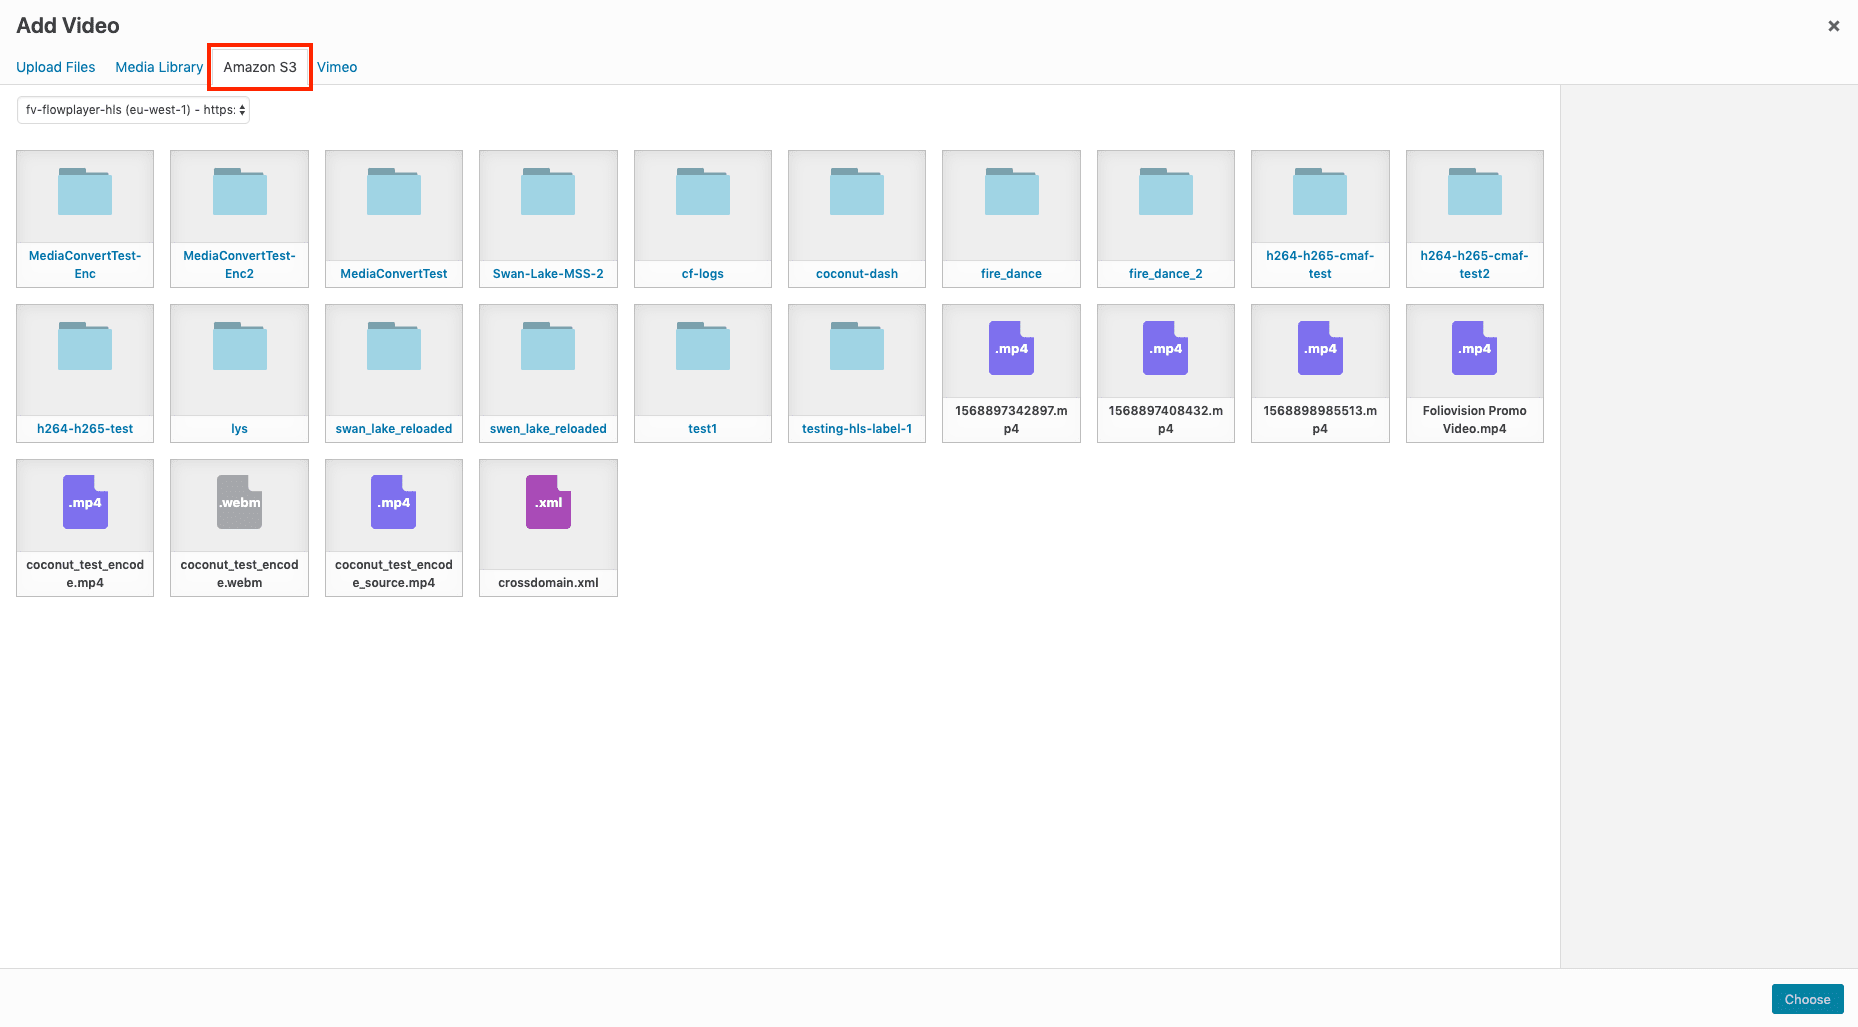
- In FV Player Editor, click Add video:

- Once in the media library, pick the Amazon S3 tab

- Find your video and click “Choose”.
- Done. Now your video will be streamed via CloudFront with signed URL (download protection). The video URL visible in page’s HTML doesn’t contain the CloudFront Signature and thus, it can’t be downloaded (your video URLs are safe from simply grabbing their URL using “show page source” web browser function).
You can check a couple of example videos in this demo.
Troubleshooting
- If you’re facing playback issues, make sure to deselect Settings -> FV Player -> Setup -> Sitewide Flowplayer Defaults -> Disable Admin Video Checker, click Save All Changes and open your post for viewing.
- Look for “Checking video…” in the top left corner of the player. Does it say “Video OK”?
- Does the video play? If not, what does the checker say? If unsure, send us a report or write us an e-mail.
Leave a Reply