We no longer recommend Cartika Hosting and would actively discourage people from using H-Sphere as their web hosting control panel. H-Sphere makes migrations difficult and expensive, even within H-Sphere.
Installing WordPress to Cartika hosting is no different than installing it on any other web host. The focus of this article is in showing the specific sequence of steps which needs to be done in order to quickly and properly install WordPress in Cartika’s Control panel.
-
First login into your Control Panel. Use the login information you received when you account was created.
-
Create a database for your WordPress installation. Click the MySQL Server icon in your Control Panel home screen. Scroll down a little to see it, it’s in Databases section.
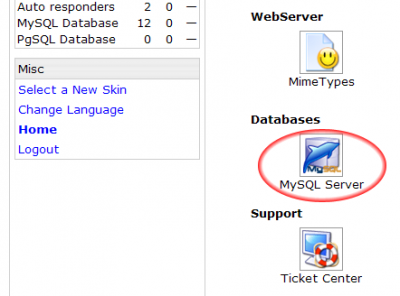
How to access MySQL Server settings -
Write down or copy the MySQL Server Host Name. You will need it to configure your WordPress installation.

MySQL Server information -
Click Add database at the bottom of the MySQL Databases list.

Add new database -
Then enter the name of the database and write it down.

New database properties -
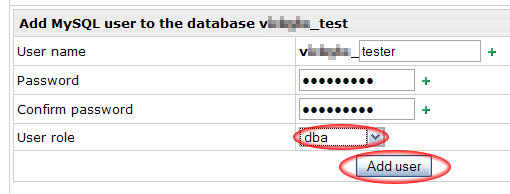
On the next screen enter the database User name, Password and set User role to dba. You can use some password generator to make a secure password. Write all of this down.

Add MySQL user to databaseNow your database is ready to be used by WordPress.
-
Next steps are about putting WordPress on your site and configuring it.
Get the latest WordPress here and unpack in your computer.
-
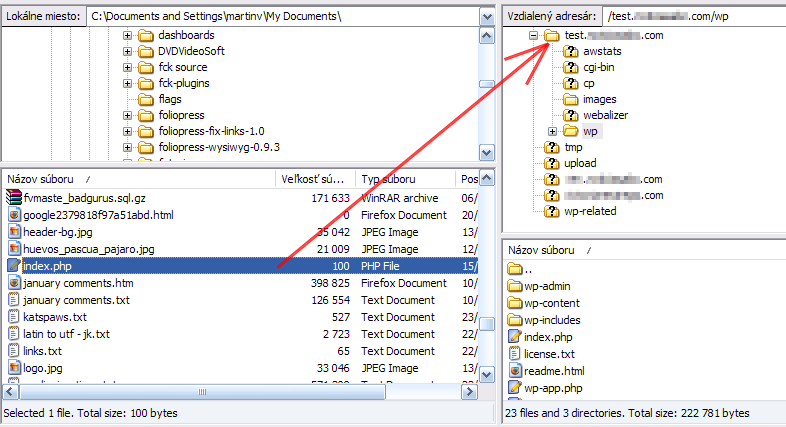
Use the FTP login information you received when you account was created to login to your FTP and see a list of domains you have. Copy the unpacked WordPress installation into the desired site directory. In our screenshot it’s the test.*****.com directory representing the domain of same name. We like to use FileZilla as an FTP client.

Copy your WordPress installation to your site’s FTP folder -
After it’s uploaded, you can rename it to for example wp, so it’s not so obvious where all of your WordPress files are located.

Renaming the folderThat’s why we are putting it into subdirectory too. We like our WordPress in /wp and our images in /images, so the site’s root directory is clear.
-
You need to create index.php with following content and copy it into your site root directory in order to have the WordPress installed is the subdirectory and accessible just with the domain name.
<?php
define(‘WP_USE_THEMES’, true);
require(‘./wp/wp-blog-header.php’);
?>
Copy index.php to your site root folder -
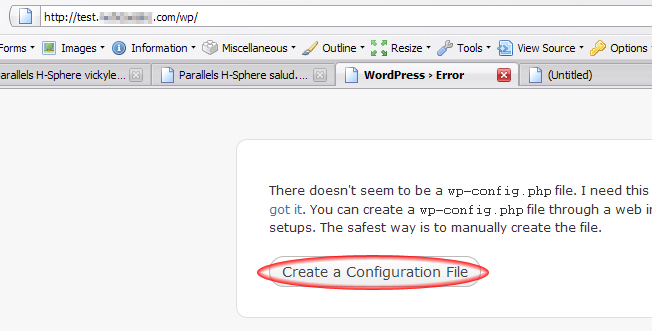
Now you can open the site via http://yourdomainname.com/wordpress-subdirectory to start the installation. It’s http://test.******.com/wp in our case.

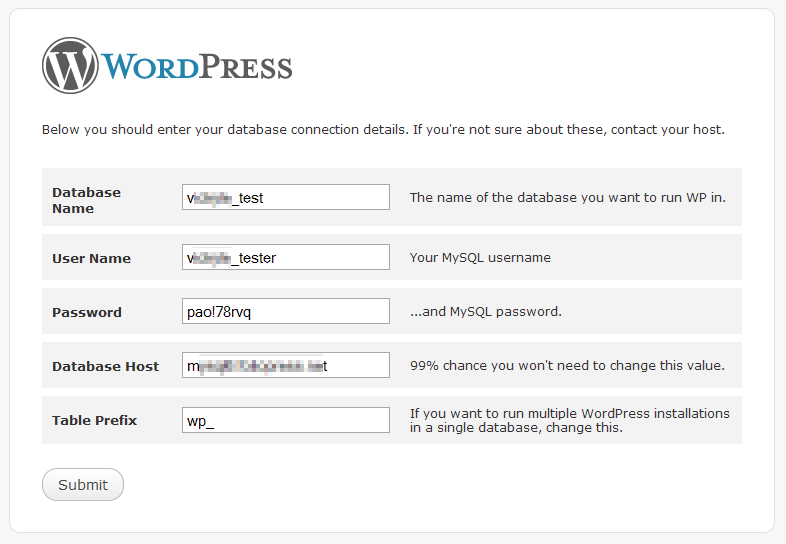
WordPress InstallationPrepare your paper with database host, database name, database user name and database user password. You will need it as you go through the installation.
- Enter your database information, press Submit and copy or write down your admin user account information. You will change it anyway, but you need it to get into your freshly installed WordPress.

installing wp016 -
That’s it, your WordPress is running. Now go to
http://yourdomainname.com/wordpress-subdirectory/wp-admin
to login into your WordPress administration interface.
-
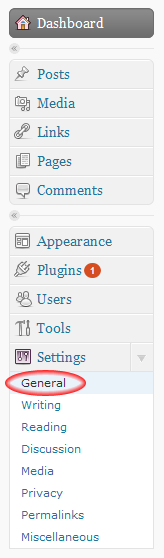
Click Settings -> General in left-hand menu to change the WordPress URL.

WordPress administration menu -
Set Blog address (URL) to your domain name. That means you remove the /wp from there. This way, your site will be accessible via your domain name, the permalink structure is using your domain name as the base address, yet all the files are stored in some subfolder.

WordPress General Settings -
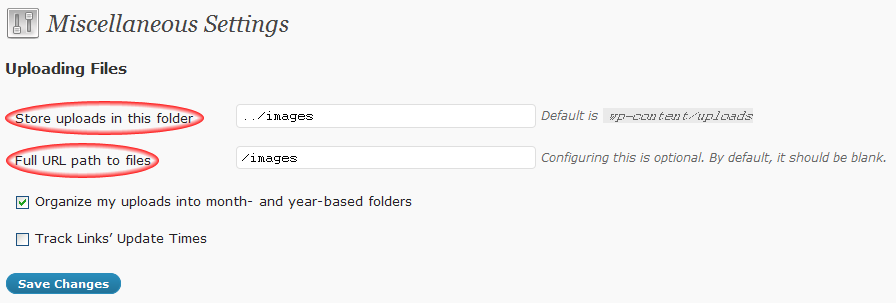
Click Miscellanious to adjust where your images are stored.
Store uploads in this folder:
../images
Full URL path to files:
/images
Make sure this directory exists in your site root folder.

WordPress Miscellaneous SettingsNote that this step applies only if you are not planing to use our advanced post editor Foliopress WYSIWYG.
-
That’s it, WordPress Installation is done.


Your WordPress login URL:
http://yourdomainname.com/wordpress-subdirectory/wp-admin
(you can create a redirection to this URL from something more simple like /admin with Redirection plugin)
WordPress URL:
http://yourdomainname.com/
Images will be stored in:
http://yourdomainname.com/images
(instead of ugly default http://yourdomainname.com/wp-content/uploads)
Further reading:
Foliopress WYSIWYG installation
Installing WordPress on wordpress.org

Martin Viceník
Martin graduated as an engineer in Computer Science from Slovak Technical University in Bratislava. He grew up in Liptovský Mikuláš in northern Slovakia next to the beautiful Tatra mountains. He is the developer behind our FV Player.
Hello Martin:
Everything sounds really clear. I’m going to give it a try this week to create some new domains through H-Sphere.
Thanks you for your entry.
Leonardo
Martin,
Thank you. If you have any more tips let me know. My host admin is telling me I need to pay him to help with this. I am hoping with your directions I am able to do it on my own without any trouble.
Thank you! June
”How to upload a wordpress site from a localhost to a remote host using a h-sphere panel” hi. i have recently developed a site using wordpress on my localhost server. now i would like to trasfer it to a remote host. this hosting company uses H-spere panel. i also got a domain. the problem is it wont work….i have created a domain and a data base in the cpanel, i have uploaded the files using a ftp client and i`ve also configured the ”wp-config.php” acording to its database and user but it wont work. when i am trying to access the site (www.mydomain.net) i receive this message ”Error 404: File Not Found” and sometimes a page appears with a requested user and password that links me to my host cpanel. how can i make it work so when i access the site the normal wordpress pages that i have created to appar? hope you can help me and thank you for your time.
Hello Andrei,
the page which is appearing could be the default index.html file. Just rename it to index.html_ and see what happens.
Another check would be to upload a test file called test.txt with some text in it. Then open it via mydomain.net/test.txt and see what shows up. That allows you to check if your DNS settings are correct and you are uploading your Wordpress into the right folder.
Thanks, M.
Hi martin. I did those changes that you told me. The dns settings where good because the test page showed just like it should. I also changed the index.html file and the page displayed just what i wrote there.
After i removed the index.html and the login.html some files appeared over the night (_vti_log, _vti_cnf, private, fp, and _vti_prv) and the site started working just fine.
Thanks a lot for you help!!!