A lot of logos on the web look like they were run over by a truck. Blurry, jagged, hideous. Here’s how to make your resized logos gorgeous and sharp.
The first point is to always save your graphics and logos as either a GIF or a PNG. Saving solid colour graphics and logos as a jpeg is a catastrophe and inevitably results in nasty digital noise. This sound elementary but I have had three trained graphic designers do this wrong, including a graduate of the Art Institute of California. The only one who knew the right answer (in what format to save a text logo) was our lead programmer, Peter.
For an example, one doesn’t have to go further than the website of Royal Bank of Canada.

RBC logo: jpeg text buzz in action
Even billions of dollars won’t save you from jpeg text buzz on your logos. Here are the jpeg jaggies in closeup:

rbc logo jpeg text buzz @ 400%
Nasty. Click the logo to see the full image at 400%. Not what you went to design academy to create.
Now that we have the correct save format out of the way (preferably 24-bit PNG – now compatible with all modern web browsers, or if the logo is simple 8-bit GIF with 256 colours can save some space), we can move on to how to handle small size text correctly.
There is one very important rule in icon design which says:
Design your icon for each size separately.
This is because, if you have for example 128 x 128 px icon, after resizing it to 16 x 16 px, you will see nothing or It will not looks how it should. The best solution is design It also for 16 x 16 pixels.
Difference between resizing and designing to small size.
Example how is it doing in Apple (Home folder icon in Mac OS 10.5)
But in some cases is designing smaller version is just too time consuming. During the course of a day a graphic designer needs to resize a logotype or graphic to a smaller size many times. We can’t hand draw every one. But if you need the logotype in very small dimensions and you want to maintain quality, it’s not easy.
A standard resizing can give your logo or text jagged edges even if you have original vector file. If your find the text blurry or illegible after downsizing, you can start by using the different anti-aliasing techniques in Photoshop testing for the best result. The options are:
None | Sharp | Crisp | Strong | Smooth

Different Anti-aliasing options in Photoshop
(From top: None, Sharp, Crisp, Strong, Smooth).
400% zoomed on the right.

Result with our method. 400% zoomed on the right.

We usually have the best results with Strong. The result will be a bit blurry but usually attractive. But with very small text, photoshop will not get very good resullt. So we need another solution…

This is result after standard resizing.
Edges are too jagged.

The image you want to resize should be in vectors (That means Shape Layers and Text Layers in Photoshop). The idea is to make very big image, and downrez it to 10% size and let Photoshop solve our problem.
- Blow up your vector image to 10 x bigger image size than the size you want in resullt (Photoshop: Image > Image Size… ).
- Open File > Save for Web & Devices…
- Change image size to the values you want (remember, your image is now 10 times bigger, so your new values should be 10% of Size you have before opening Save for Web & Devices…) and set quality of resizing to Bicubic Sharper.
- Save your file.
Now in the small image you can see clean edges of our logotype.
Example: you have 500px wide image and want 150px width. Then Resize it from 500 px to 1500px and export it via Save for Web & Devices… with 150 pixels on width.
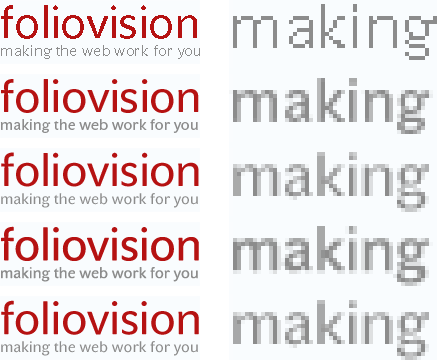
Compare the diferences with standard resize and our method:

Normal poor result on left with standard resize.
Result of our method on right.

Some differences can be seen after zooming both images. Especially on letters f and o.

Example 1: Standard resize on left. Our method on right. 400% view.
Another zoomed example. There are not a lot of difference for first look, but on the letter m or a you can see that text on left is too strong and jagged.

Example 2: Standard resize on left. Our method on right. 400% view.
Note: You can do this also with non-vector images, but then you will need to have a four to ten times larger file than your destination size as your starting point.
For best results you should always use round numbers, i.e 10%, 20%. 25%, 50% of Original size for best results.
Why?
With a round number, Photoshop divides the pixels by a multiple (2 or 4 or 5 or 10) which means Photoshop doesn’t have to interpolate nearly as much.
If you start form a large enough original, an exact multiple becomes less important as Photoshop has lots of pixels to choose from when interpolating and the rounding will not be as noticeable.

Alec Kinnear
Alec has been helping businesses succeed online since 2000. Alec is an SEM expert with a background in advertising, as a former Head of Television for Grey Moscow and Senior Television Producer for Bates, Saatchi and Saatchi Russia.
Hello Dana,
I’m glad this helped you. It’s required reading for all our designers. Most designers think they know these basics but they don’t.
Even people who should know better like SixApart (publishers of Typepad) don’t save their logos in the right format.
The same principles should apply in Fireworks. We use Photoshop as an example as we haven’t been able to find an image editing program with better algorithms for compressing and resizing images for the web. We tried almost all of them, but the Photoshop algorithms are superior.
Thank you for this great explanation. I’m a newbie at web development, and your description made perfect sense. My only question, is that when you reference Photoshop, I suspect that using Fireworks is analagous. I’m able to save in all the formats (.gif, .png, .jpg, etc) and I’m just wondering whether your saving as a big file, but rendering it smaller would work the same… I suspect so… Thanks, Dana.
Excellent advice, thanks very much.
Looking forward to trying it out tonight..
Hi – I was just reading your post on saving images for the web. I am having trouble with a logo, and I can’t figure it out.
It needs to be 85 px wide by 98 px high. I’ve created it in Illustrator at that particular size, then saved it for web (PNG 24) but it always looks blurry when I publish on IE7. It’s better on Firefox, but horrible on IE7.
Any help would be appreciated….
Thanks, Kathy
Hello Kathy,
I would try to open up the AI file in Photoshop and save it for the web from Photoshop and not Illustrator. I don’t use Illustrator much myself, but have had problems saving for the web.
Grateful to have found your information! My friend had a huge graphic she sent to a printer as a .jpeg, for business cards, and they couldn’t get the image to downsize sharply. In PaintShop Pro X2, there’s no Save For Web Devices choice, but Save For Office gives Advanced Settings to re-size the image, chose quality & file type. Worked perfectly! I did use the unsharp mask to tweak the new image slightly. Thanks so much!
thank you for posting this. i’m helping a co-worker with their church banner which is currently very jagged in appearance and while i’m pretty good in some applications, I don’t know much photoshop or illustrator which I plan to change shortly. it is nice that to know that i don’t have to redraw the thing by hand because i’m not an artist.
thank you for the advice. I was really annoyed already, wasting time, looking all over for the solution and feeling stupid… I hate jagged edges!
great guide, thanks a lot.
but there is on thing i can’t get right, my logo text size is 75 x 300. and no matter what i save my logo either in jpeg or png i am getting fuzzy text, how do i make it look perfect in text font size 38?
Thank you very much Alec,
Very useful tutorial.
I like the way you have included images step by step, comparing the different results.
Well done!
Thank you,I’m gonna try this right away!
There aren’t many posts which are still relevant three years after they are written but I think this one will remain so for many more years to come. Proved very useful to me. Thanks again.
Speaking of current relevance. I know that Adobe Photoshop has really made some significant changes especially with CS6.
Is there any recent changes worth noting, or is this still the best way?
I had figured out everything except the factor of 10. That was far from obvious, but makes sense.
Also, you speak of making the image to size to begin with. Do you have any tips regarding this. I have steered clear of working from such a small canvas but clearly that creates a much cleaner image.
Great post…thx.
Thanks, I was almost at the verge of pulling my hair when I found your tips online.
It worked like a charm. Like GeoXman I did everything right except for the factor of 10.
Thanks a lot.
I’m an IT admin, not a designer and I often have to resize logos for letterheads, email signatures etc. Your post has saved me hours of frustration, tinkering with settings and going back and forth with users…
Thanks a lot.
Im going to cry. It didn’t work. I’ve been trying this for 12 hours.
Hi Misti,
Give us some more information.
Alec’s advice on this page is excellent so I would say the problem lies elsewhere.
Not sure if the admins will allow us to sort this out here, but if not we can take it offline.
Either way we will try to get it sorted for you.
Regards,
John
Really very helpful for me. I am very good experienced person in print media, and now I started working for web also, and really this tutorial helps me a lot. :)
This was really helpful,.. I feel like opening champagne.
I’ve been struggling with downsizing text for a while.
I wanted a 250px wide text based logo. I made it 2500px Used the image resize to make it 250px using bicubic sharper. Then I saved for web using png24 using bicubic sharper also.
Come up great, and I’m not even sure I followed all the steps correctly.
Please can you tell me how do you use the “Save for web” box in Photoshop when you save png or gif transparency? I’ve been tried in several ways.. always with terrible result :(
Excellent explanation. The step by step instructions worked a treat. Thank you!
Quite informative and helpful. Thanks for your sharing.
Thanks. You have given me hope. I’m self taught and text quality has been driving me mad! I don’t seem to have ‘save for web and devices’. Can I just open a new image at 10x the final size I want, design it all then ‘resize image’ and save as a GIF file? Suddenly seems too easy!
THANK YOU SIR, you have helped me tremendously!!! Everyone else online makes it seems impossible and time consuming and your technique saved me so much time.
Thanks Ahmed. We are focused on making the difficult simple, in a platform agnostic way. IT companies (the new Apple included) are focused on crippling our abilities to do simple tasks without reliance on a single company.
Late to the party as usual but I have been Googling for some help. Thanks for this. However, my static PNGs look great but when I turn them into animated GIFs in Photoshop the quality drops quite substantially. Is there a trick here too please?