Short version for trained commandos
Open terminal and navigate to the directory where the broken video files are stored. Run this command in terminal:
for f in *.mp4; do ffmpeg -i "${f}" -c copy ${f%%.*}-2.mp4; done
Full version including backstory with instructions on proper installation and use of ffmpeg on OS X
I’ve been using a combination of MDRP (MacDVDRipper Pro) and Submerge to create hard subtitled versions of Austrian classic show Kommissar Rex for our six year old starting school this year in German. We don’t speak German at home, so it’s important that most of his entertainment comes in this language. I need the subtitles to be able to follow the action closely and help Constantin with vocabulary.
The finished files play and the subtitles look great:

Kommissar Rex S01E02 with hard subtitles added in Submerge
Unfortunately on the computer the container is broken and the video shows as being 1192:52:46 long. That’s 1192 hours long.
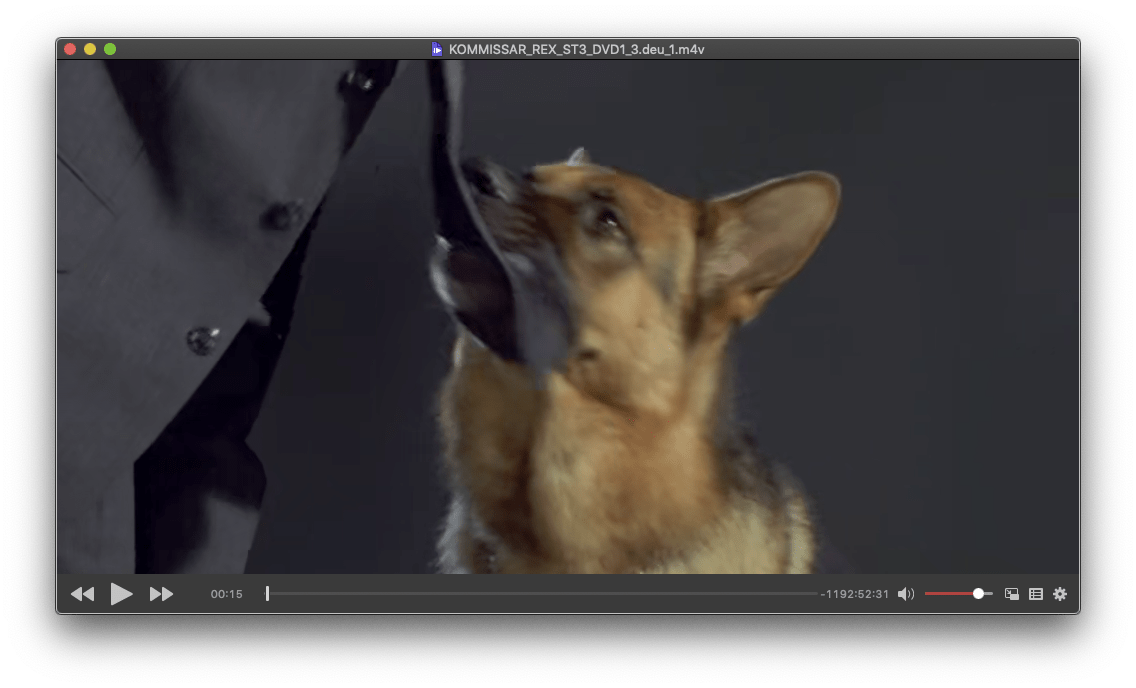
Screenshot of very long timecode-after-Submerge ffmpeg conversion.
A 45 minute episode shows as 1192 hours long
The 1192 hour length makes it impossible to use the timeline to scrub (right away one is in blackness). It’s not a critical issue – the files do play back on our Sony X700 and our Pioneer BDP-450 blu-ray players – but I don’t like broken things so I set out to find out what the issue is.
First I tried using some of the other Submerge presets to create my submasters with hard subtitles. No luck, they all showed 11.59.59.45 as the movie length (is that one week or sixteen hours). Next I tried modifying the presets in Submerge (located at within the app package at Submerge.app/Contents/Resources/Presets but didn’t have any luck changing them enough to be able to create movie containers which weren’t three days long.
Subtitles created from the same MDRP masters in ffWorks don’t have this issue – the length is normal, 45 minutes. Files created from Submerge hard-coded subtitle submasters with 1192 hour time codes after a second conversion in ffWorks also show the correct time code.
How ffmpeg can fix a broken .mp4 and .mkv video file almost instantly
Experimenting with the Submerge ffmpeg preset files made me think more about using standalone ffmpeg (the engine in both ffWorks and Submerge) to clean up these files. I remembered hearing about a zero copy which could make broken mp4’s downloaded from the internet open and play again. It took awhile to find the code to do this but eventually I did.
A simple repackaging of the file is this command:
/Users/Alec/Library/Application\ Support/FFmpegTools/ffmpeg -i input.mp4 -c copy output.mp4
What’s great about this command is that it’s almost instantaneous (400x real time speed) and does not re-encode so your output video remains the same generation as the input.
Fixing more problematic files with ffmpeg
There’s a more sophisticated version of the command above which performs a basic transcoding.
/Users/Alec/Library/Application\ Support/FFmpegTools/ffmpeg -i "input.mp4" -c:v libx264 -crf 22 -preset slow output.mp4
The benefit of re-encoding the file is that it will definitively remove any encoding errors. The downside is that it ages your video another generation. It’s basically like resaving a jpeg image. Gradually blocky shadows, chroma noise and jaggies will get worse.
You can choose whichever ffmpeg library you like on your computer. To start this experiment is just used the most recent of the dozens of copies I have on this computer rather than reinstalling. Now that I’m using ffmpeg directly from the command line, I’d like to be able to run the ffmpeg binary without a path. Installing ffmpeg on OS X used to require install the homebrew framework first. Happily not any more.
How to install ffmpeg without path on OS X
To do so, one should add yet another copy of ffmpeg in usr/local/bin. Here’s how.
- download ffmpeg and decompress the zip
- in Finder use the shift-command-G (Go to Folder) com to open the otherwise hidden
/usr/local/bindirectory - drag and drop the ffmpeg binary there (OS X will ask for authorisation as
/usr/local/binis a protected folder - chmod, as sudo, the files to make them executable:
sudo chmod +x /usr/local/bin/ff* - type ffmpeg into terminal to make sure all is working.
The output should look like this:
OfficeTower:~ alec$ ffmpeg
ffmpeg version 3.4.2 Copyright (c) 2000-2018 the FFmpeg developers
  built with Apple LLVM version 8.0.0 (clang-800.0.42.1)
  configuration: --prefix=/usr/local/Cellar/ffmpeg/3.4.2 --enable-shared --enable-pthreads --enable-version3 --enable-hardcoded-tables --enable-avresample --cc=clang --host-cflags= --host-ldflags= --disable-jack --enable-gpl --enable-libmp3lame --enable-libx264 --enable-libxvid --enable-opencl --enable-videotoolbox --disable-lzma
  libavutil      55. 78.100 / 55. 78.100
  libavcodec     57.107.100 / 57.107.100
  libavformat    57. 83.100 / 57. 83.100
  libavdevice    57. 10.100 / 57. 10.100
  libavfilter     6.107.100 /  6.107.100
  libavresample   3.  7.  0 /  3.  7.  0
  libswscale      4.  8.100 /  4.  8.100
  libswresample   2.  9.100 /  2.  9.100
  libpostproc    54.  7.100 / 54.  7.100
Hyper fast Audio and Video encoder
usage: ffmpeg [options] [[infile options] -i infile]... {[outfile options] outfile}...

Use -h to get full help or, even better, run 'man ffmpeg'
In my case, I didn’t need step four (chmod) for ffmpeg to load and work. More detailed installation instructions here.
How to convert not single video files but whole directories with ffmpeg
The next issue I faced is that I have directory full of thirty of these files.
Writing out /Users/Alec/Library/Application\ Support/FFmpegTools/ffmpeg -i inputvideo.mp4 -c copy /path/to/outputvideo.mp4 thirty times didn’t sound like much fun, even when copying and pasting paths. There’s lots of ways to automate a directory conversion on OS X, via Automator or AppleScript of KeyboardMaestro.
But since we are already on the command line, doing the whole batch conversion in bash makes the most sense. The answers linked at Stackoverflow are mostly too complicated with multiple line commands. It can all be condensed down to a single line, which is easier to read:
Here’s how:
for f in *.mp4; do ffmpeg -i "${f}" -c copy ${f%%.*}-2.mp4; done
This will create a second version of every video with “-2” at the end of the filename: yourvideo.mp4 –> yourvideo-2.mp4
Or alternatively, to put the files in a subdirectory:
for f in *.mp4; do ffmpeg -i "${f}" -c copy "copies/${f}"; done
Don’t forget to create the “copies” subdirectory first though or the command will fail.
How to convert .mp4 files to .mkv format with ffmpeg
The copy command also works to convert an mp4 to a mkv file:
for f in *.mp4; do ffmpeg -i "${f}" -c copy "${f%%.*}.mkv"; done
In this case no subdirectory or number is needed as the the .mkv files will not overwrite the .mp4 originals (better make sure it’s not a mixed directory with .mp4 in that case). For a mixed directory of course one should run:
for f in *.mp4; do ffmpeg -i "${f}" -c copy "copies/${f%%.*}.mkv"; done
With both of these single line commands, it is so easy and fast to clean up whole directories of .mkv and .mp4 video files that I’ll be using ffmpeg far more often from the command line. Remember that by using this command, you are not re-encoding the video but just letting ffmpeg clean up and put the file in a fresh box.
How to convert .mp4 files to .m4v format with ffmpeg
The copy command also works to convert an mp4 to a m4v file:
for f in *.mp4; do ffmpeg -i "${f}" -c copy "${f%%.*}.m4v"; done
How to convert .mp4 files to .webm format with ffmpeg
Recent versions of webm allow us to convert to Google’s webm format.
ffmpeg -i input.mov -c:v libvpx -preset slow output.webm
In this case no subdirectory or number is needed as the the .webm files will not overwrite the .mp4 originals (better make sure it’s not a mixed directory with .webm in that case).
Encoding presets for creating .mp4 submasters with ffmpeg
This same command structure can be used for encoding in other formats, i.e. the main conversion. A set of good presets for creating web versions of videos is the subject for another article as our current instructions for encoding HTML 5 videos could use an update.
Here’s a basic conversion though:
ffmpeg -i "input.mov" -c:v libx264 -crf 20 -preset slow output.mp4
This will convert the master to .mp4 format with very high quality at the existing resolution.
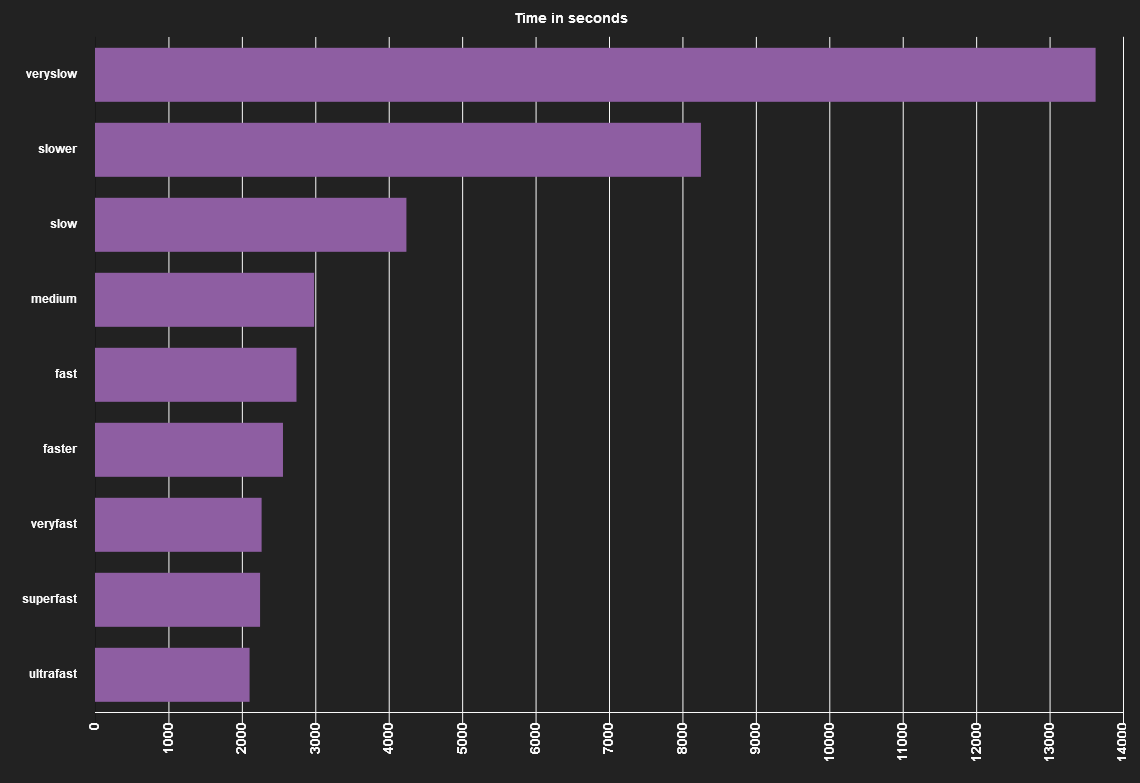
-crf 20controls visual quality and file size: from 17 to 28 are sane values. Feel free to experiment with file size to suit the bandwidth of your server and the importance of quality.-preset slowaffects encoding speed and degree of compression. Slow is the optimum setting for good visual quality and fast conversion. There are also-slowerandveryslow.sloweris about twice as slow with no visible difference (less than 3% tested with tools).veryslowis more than three times as slow with no visible difference (less than 1% tested with tools) thanslow.
Happy encoding!

Alec Kinnear
Alec has been helping businesses succeed online since 2000. Alec is an SEM expert with a background in advertising, as a former Head of Television for Grey Moscow and Senior Television Producer for Bates, Saatchi and Saatchi Russia.
Leave a Reply