At feedback.dxo.com, Roseblood asked about an article on my workflow in DxO PhotoLab. I know I’ve written one but couldn’t find it in my archives there. As I’ve spent countless hours improving that workflow to process artistic, football and family photos, I’m happy to share it, this time in a more permanent format.
Why DxO PhotoLab
For those not familiar with DxO PhotoLab, it’s RAW development tool. Other top-tier tools in this market place include Adobe Lightroom, CaptureOne and Iridient Developer. Those tools are named as they are the ones I know capable of producing first quality technical results.1
I prefer DxO PhotoLab above all the others as:
- it offers a very clear workflow and doesn’t require using its own cataloguing features (C1 I’m looking at you) to start developing images.
- looks great (looks are important in artistic tools).
- has wonderful tools to handle high-ISO photos (most of my football production).
Any photographer shooting at 3200 ISO and higher with a Canon camera owes it to him or herself to try DxO PhotoLab on those high ISO photos. CaptureOne and Iridient Developer simply can’t keep up. Lightroom comes closest but with loss of some colour and detail.
Culling/Choosing Selects
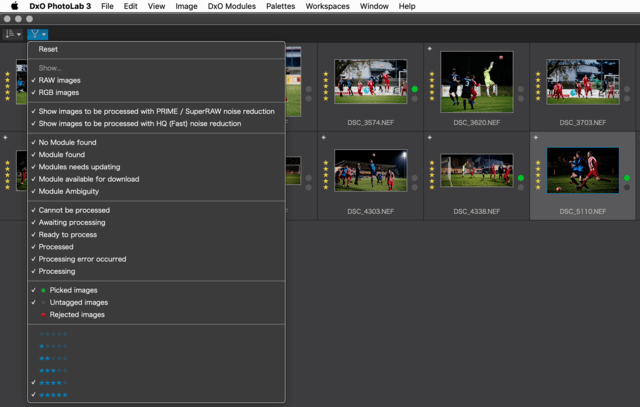
I start by culling my photos in FastRawViewer, a $15 utility which every photographer should have. While it’s technically possible to select photos in PhotoLab, FastRawViewer is so much faster and more efficient for culling that I couldn’t imagine not choosing selects there. Happily FastRawViewer creates XMP files which are read by PhotoLab when moving a folder over to PhotoLab. In the PhotoLab folder view, one can restrict which photos appear. Most of the time, mine is set to four and five star RAW files only.

Example: filtering a folder of selects
For very large jobs (football for instance) where I may start with over a thousand originals, I’ll move the select photos (four and five star) into a selects folder and only move that to PhotoLab to reduce overhead when processing that folder. For small sessions, I might just open the whole folder but restrict visibility to four and five star or just five star images.
PhotoLab Processing Workflow: Setting up Your Screen
There are three keys to my workflow with PhotoLab. Point one is above: start a PhotoLab session with only selects visible.
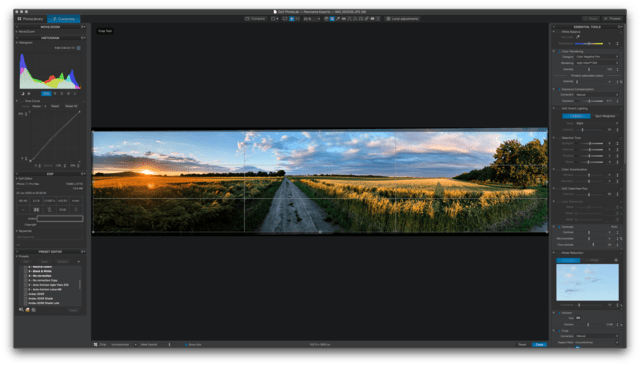
Point two is to set up your screen properly.

Warning: attached Image is very large, as it’s a full resolution screenshot of a 4K screen
For me this means Histogram and Tone Curve and EXIF information on the left. Presets underneath. This keeps all the information about one’s image available in one place, as well as Curves available at all times. I started editing with curves in Photoshop and a custom S curve or even inverted C curve can solve most image issues faster than any other tool. I’ll often apply a tone curve first and then work with PhotoLab’s Selective Tone and Contrast tools for a more subtle version, finally turning off the Tone Curve completely.
Before touching an image I always apply a preset to it. After getting over the initial learning curve with PhotoLab, I recommend that no photographer ever use the DxO Default profile. The corrections are too strong and too primitive. The tools there are flashy and it’s a good starting point to learn the power of the application but then it’s time to create your own visual signature. In the end, PhotoLab is just a tool like a paintbrush: the goal is that it should be an extension of your own arm and your own vision.
Collapse All Palettes except Essential Tools
The final workflow key is to move all of the tools I actually use (about two thirds of them) in the order I usually apply them into the right hand column. I then work downwards through those tools for each image. I call this method of photo processing photo linear workflow.
My Essential Tools palette includes the tools below in this exact order:
- White Balance first. Without a suitable white balance, no image can be properly viewed or corrected.
- Color Rendering (color rendering affects the image so fundamentally it’s best to get the one in you plan to use early: there’s a short list of profiles I use and which)
- Exposure Compensation. Many images need a general boost or slight lowering of exposure. I’ll often come back to this one after working with Selective Tone.
- DxO Smart Lighting. I rarely use Smart Lighting. It’s a great tool for images where there are large areas which are underexposed and large areas which are fully exposed or even over-exposed. Smart Lighting will quickly balance the exposure of the image. Smart Lighting is great for journalistic work but far less useful for artistic work. For instance for a football shoot with very difficult lighting, I’ll use Smart Lighting often as I’ll face sixty odd images to finish and Smart Lighting will get the job done much faster than Local Adjustments and exposure gradients.
- Selective Tone. This is one of the crown jewels of PhotoLab. Unlike the Lightroom sliders which very primitively just apply to a very narrow band of exposure, the PhotoLab tools are smooth curves interacting in the background. Increasing highlights will boost the mid-tones. Decreasing the mid-tones will dim some of the highlights and deepen the top of the shadows. Blacks will affect the shadows. This crossover is essential to maintaining an organic looking image. The Selective Tone sliders are like Miles Davis’s trumpet, there are only three buttons. It’s how you learn to play those buttons.
- Colour Accentuation. I used to use this more but my Color Rendering profile choices have reduced my need to change saturation as much. Often what I do is to increase Vibrancy while lowering Saturation. This makes intense colours more intense but doesn’t oversaturate the less intense colours.
- DxO ClearView Plus. Very powerful magic here. I liked it a lot when I first started working with PhotoLab. What Clearview does is play with contrast, tone, micro-contrast and sharpening to bring out the detail in an image. For an automated tool, ClearView Plus does an amazing job. These days I prefer to add my own micro-contrast recipe. I’m already adjusting Selective Tone myself so ClearView Plus normally will be too strong an effect for me.
- Lens Sharpness. This is the tool I prefer to make changes sharpness for supported lenses. It’s a very powerful and unique tool based on painstakingly profiling thousands of lenses manually. I only use the Global slider most of the time.
- Contrast. This includes both Microcontrast and if you have FilmPack (which you should), Fine contrast. The key slider here is the Fine contrast slider. It adds a lot of detail in images without turning them into grainy aging Clint Eastwood portraits (which is what a large does of normal Microcontrast tends to do).
- Noise Reduction. Prime Noise Reduction is one of the key selling points of PhotoLab. PNR is absolutely wonderful when dealing with high ISO Canon images (5D III, 5DSR) which are all afflicted with vile blotches of chroma noise. PNR will make this just go away.
When shooting Nikon or at a moderate ISO (6400/3200 and below, depending on the camera), colour noise is not such an issue and the HQ Fast noise reduction is often more than enough and aesthetically more pleasing as it creates or enhances film grain while making luminance noise disappear. While previewing your images, you only see HQ Fast noise reduction. To learn the effects and limits of PNR, it’s important to export and check what works for your images.
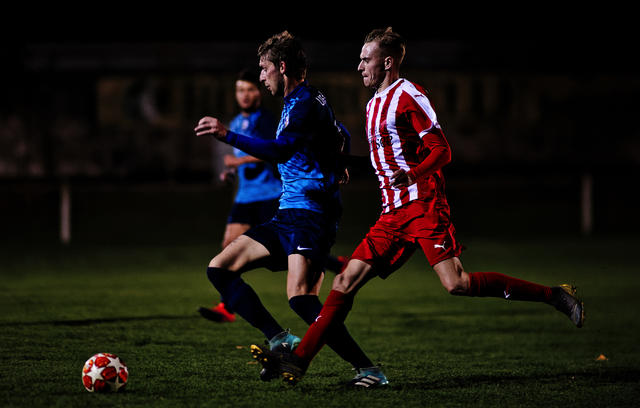
1/1250 second 300mm f2.8 at 12800 ISO
Prime Noise Reduction: set at just 12
I set my own PNR at about 12 to 20 when I use it. After that PNR starts to smooth the image. I very occasionally use high PNR to deliberately smooth skin in a portrait. For HQ Fast noise reductions, I will use anywhere from 15 to 35. Adding too much HQ Fast noise reduction does not offer the same glam effect as Prime Noise Reduction. - Horizon. The auto-horizon in PhotoLab is more reliable than any I’ve tried elsewhere. It’s part of my standard preset. Horizon is easily corrected with a ruler. I’m glad not to have to rotate my images by the corner.
- Crop. Each of my images is unique so I prefer to have aspect ratio unconstrained. The autocrop does what it should and just cuts out the black parts. Autocrop also included in all my standard presets.
- Chromatic Aberration. When it’s there, it’s good to have tools to fix it. I don’t usually want to attack chromatic aberration before this point as lens sharpening and fine contrast and tone selection will have changed just how visible it is. Why fight chromatic aberration which ends up cropped out or in deep shadows?
- Distortion. Lens Correction should have taken care of distortion issues. For vintage wide angle and fisheye lenses, manual options are great.
- Moiré. Don’t see much of it on my images but with PhotoLab it couldn’t be easier to eliminate moiré. I didn’t find my images much compromised by cranking on a healthy amount of automated moiré suppression in PhotoLab. I’m glad it’s so easy.
- Filter. We don’t use coloured filters much more on our digital images. Here’s your chance to apply them after the shoot. I’ve found these filters to be very effective in correcting images with troubled colour. Should have just used a filter in the first place in the field probably! They are also good fun for experimenting with more creative looks for your images. Much better than just applying a pre-made Instagram preset.
- Grain. I don’t normally add grain to my images here, as I would normally choose an appropriate Colour Rendering profile which already includes the grain I want. Or I add grain via HQ Fast noise reduction. Still sometimes I want to add grain directly and this is a good tool to do so. The Nik tools have better grain simulations but the whole retro dirty film/dirty lab/grungy image trend passes me by. I fought with expired film, unreliable labs and grungy images from Zenit cameras for decades: deliberately making my images look grungy in post mostly seems absurd.
- Creative Vignetting. I love this tool. Very bright and distracting corners are out of place in many images. A bit of vignetting directs the eye and makes an image seem more natural. At this point in my life, I own a lot of glass which simply doesn’t vignette. I’m stuck putting vignetting back in. Doesn’t affect my Canon M gear though. 1960’s level vignetting is baked right into those tiny lenses.
Of course, sometimes I work out of order if it’s essential to apply Horizon and Crop first to better understand an image.
What’s not on that list?
- Perspective. I use it often and did have it just below Horizon at one point. Time to add it back. When I need perspective correction it’s obvious to me and I’ll go and get it from the Geometry Palette.
- Unsharp Mask. I’ve usually applied all the sharpening I need or want with Lens Sharpness and Fine Contrast.
- HSL. Should add it back in and use it. Just had a big upgrade in PhotoLab 3 (wasn’t much use before that). Used the C1 version quite a bit (as it works really well).
- Style – Toning. I’ve experimented with this but I don’t normally like to do this. If I want to tone an image, I’ll probably use a colour filter.
- Channel Mixer. Best for working with black and white. If I were doing a lot of black and white, I’d add the Channel Mixer to Essential Tools.
- Frame. There are some nice options like Darkroom Two or a simple white border. I don’t normally add borders to my images so Frame doesn’t make the main workflow list.
- Blur, Texture, Light Leak, Miniature. I don’t normally need or want these so I like to keep them out of sight and out of mind.
- Focal Length, Focusing Distance. I don’t know what these do. As far as I know, focal length and focusing distance are a done deal after the shoot. Must investigate to find out what I’m missing sometime. For now, just another potential distraction.
The real key to an efficient workflow is to work systematically through each image.2 Add the tools you need and use and remove the tools you don’t. Those tools will still be available in their main palettes, Light, Colour, Detail, Geometry, ViewPoint, FilmPack.
After the core corrections are made, then it’s time to work on Local Adjustments (extremely powerful, includes Nik’s U-point technology). In PhotoLab 3, the repair tools (Clone and Repair) are now fast enough to do light work. If you are facing a major clone and repair job, you should be in Affinity Photo, Photoshop or another bitmap editor with really solid tools and fast undo. Repair undo remains fairly slow in PhotoLab.
When I’m finished correcting selects, I’ll go through the results and greenlight (Pick tool) the ones I’d like to export.
When I export, I export full size jpegs (note: should switch that to TIFFs for artistic work as jpegs are only 8-bit; I may not always have access to PhotoLab or my RAW files in the future) to a subfolder of the originals. I later move that subfolder to a parallel folder of the originals. I rename each image here to give it a sensible name. If I could add custom name pre-export within PhotoLab, I would prefer that. I certainly don’t bother to name files pre-culling. Back-breaking work ending up on the cutting room floor.
After creating these master, I use ResizeMe to create versions for web or Facebook or feedback.dxo.com or Disqus, depending on the requirements (2000px, 3000px, 6000px width). As the masters have been renamed to the photo title, the versions all have the right names. Each versions set goes into a subfolder named for its destination or size.
There’s room for improvement here. The ideal structure would be to have a separate catalogue of folders of finished images rather than mixing them in with the huge folders of originals. Long term archive value are finished images.
-
Open-source RawTherapee is at least equally capable but is a bear to work with (at least on MacOS). DarkTable is another very good open-source tool and has an easier workflow than RAWtherapee but is messy to install on MacOS. ↩︎
-
Bonus Tip: when you have many similar images, start by correcting two or three properly. When you are confident in your main processing, create a Preset for that particular recipe. After that you can apply it to other images as a starting point with a single click. Presets is a big enough topic that their creation and management require its own article: for now, know that presets exists. Once you master an effective linear workflow, presets can help you bump up your efficiency. ↩︎

Alec Kinnear
Alec has been helping businesses succeed online since 2000. Alec is an SEM expert with a background in advertising, as a former Head of Television for Grey Moscow and Senior Television Producer for Bates, Saatchi and Saatchi Russia.


Just purchased ver4. This workflow is exactly what I was looking for. Peace.
How did you change the order of your favorites? I can not find Moire, Filter or Grain.