We want to have nice pictures in our posts. So do You. Good composition, colors and focus are by all means necessary. But there’s at least one more step between picture in your camera and picture on your web – resizing. Either on your computer in your own image editor, or on the server using image processor designed for that purpose, or on both.
In this article we will look at the quality of the server-side processing of the pictures when they are being resized. There are two tools for image handling running under php. First is build-in php image processor called GD. Second tool is ImageMagick which needs to be additionally installed on the server.
Focus on Details
If you want really nice pictures, details matter. Details are the magic that makes the picture look extraordinary good. We examined how GD and ImageMagick behave when it comes to details. With GD we don’t have many ways how to affect the result, but with ImageMagick we have the choice of filters and sharpening options. Look at the following portrait and notice the difference. You can see that the GD picture looks somehow blurry while the ImageMagick looks more sharp and preserves details.

GD, 32kB |

ImageMagick, 63kB |

Photoshop, 58kB |
Details in the following example are even more disturbing in the case of GD. You can clearly see not even the blurriness, but also ugly artifacts around the windows – the set of lines formed by windows is really distracted in the GD case.

GD, 29kB |

ImageMagick, 65kB |

Photoshop, 56kB |
As you probably already have noticed, the ImageMagick files are significantly bigger than the files produced by GD. This is the price we are paying for keeping the details. In comparison, Photoshop has slightly smaller files than ImageMagick.
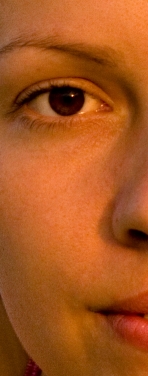
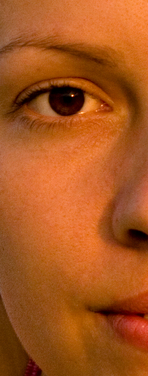
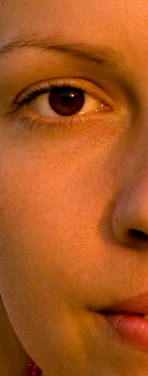
The last example might be not so obvious. We resized the original picture only to 50% of it’s size and cropped part of the face:

GD |

ImageMagick |

Photoshop |
If you look very carefully you can see the small differences around eyebrows, eyelashes and in the center of the eye.
Sharpening
Another feature provided by ImageMagick is sharpening, while GD does not offer this option. Sharpening is applied during the resizing process, by default no sharpening is used. We already noticed that even this option is turned off, the pictures processed by ImageMagick look more sharp then the ones from GD. Here we offer a closer look at the effect of different sharpening values:

ImageMagick, no sharpening (=1) |

ImageMagick, sharpening=0.9 |

ImageMagick, sharpening=0.8 |

ImageMagick, sharpening=0.5:
|
We can see that slight sharpening (0.9) as used in the top left picture might be sometimes handy, but care should be taken to not use this parameter in extreme values as ugly artifacts come along this process – see the area around eyes or hair in the bottom right picture.
Conclusion
We care about how our pictures look, and so should You. In this comparison we showed that ImageMagick behaves much better when it comes to details and we think that ImageMagick should be used instead of GD whenever possible. We are willing to pay the price of bigger files in favor or preserving details.
Technical note
In this comparison we used the compression quality equal to 100% to not get any form of distraction from the compression algorithms. The filter used in ImageMagick for the resize was the Lanczos filter.
Wanna try it yourself? Here are our test images: building.jpg and girl.jpg
that’s very useful to see this comparison
however there is a sharpen function in GD – (I haven’t tried it yet) vikjavev.no/computing/ump.php?id=306
I think you should create two files that are a similar file size – e.g if you leave the GD file of the girl at 32k – then convert using IM until you get a file of 32k … I think the quality will then be the same
Hi Mark,
thanks for your tip. I’ve looked at the link you’ve sent, and you’re right, this piece of code is a sharpening function. But, it is not a build-in GD function, it is an implementation of some sharpening algorithm which uses GD functions. Having the basic image processing functions, you can implement a large variety of functions, and we’re sure there are plenty or them available online. In this comparison we focused at build-in GD functions, that’s why we haven’t used any of these algorithms. GD as well as IMagick have the option of building your own algorithms, but that would lead us into programming the best sharpening algorithms. But this was not our intention. Thanks a lot for digging that piece of code, it’s good to know that somebody already did that!
Your second tip is also very interesting, we will look at that.
You should compare all of them in same size
Hi Tweak,
yes, you’re right, that would be an interesting comparison too. We’ll think about it, thanks for your suggestion.
Zdenka
You can’t compare the size of a file generated with GD and a file generated with ImageMagick. GD creates a brand new image and loses all the meta informations. ImageMagick preserves the misc infos like the camera brand/model, comments… and the ICC profile, which takes some kb but keeps the color correct. You can suppress these infos of the imagemagick files using jhead, but also use some optimizer which keeps every pixel the same. For example, imageOptim under OS X (which is basically a GUI for a few command line optimizers — free).
Interesting post, Joey but…
Why again can we not compare the size of a file generated by GD and ImageMagick?
What would you suggest if one does not have ImageMagick available on his/her server?
I have a client for whom I am building a website with more then a thousand Highres pictures, however ImageMagick is not available.
I was afraid you would say so. Guess there is no other option,
Thanks a lot for your help, much appreciated.
Hi Vincent,
Move servers.
I would not host an image driven site on a server without ImageMagick. It’s that big a difference.
Making the web work for you, Alec