SendLoop is an email marketing software and this article shows you how to setup your domain properly to be able to send email from it.
-
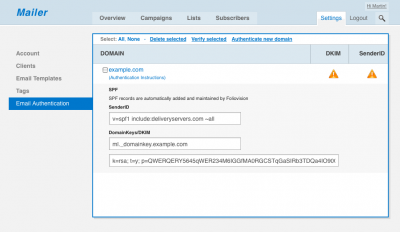
First login into SendLoop and open up Settings -> Email Authentication. After you add a domain, it will be verified for the correct SPF and DKIM entries. Unless you already entered these information into your DNS zone file, this test will fail. Click the domain name to see Authentication Instructions:

SendLoop Email Authentication Settings -
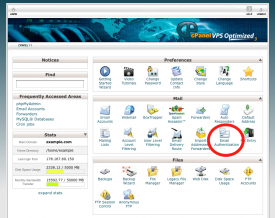
Now we need to add that into our DNS zone file. Login into your site’s Cpanel like this:
example.com/exampleGo into Mail -> Email Authentication

Cpanel Email AuthenticationYou should be seeing this in the DomainKeys section if you how no DKIM set up:

Cpanel DomainKeys DisabledEnabling this option will generate the default DKIM for your domain. When you do that, you can continue with the next step.
If you, however, see this message:
"WARNING: DomainKeys cannot be used because this server is not a DNS server for example.com [?]"
“WARNING: domainkeys cannot be used because this server is not a dns server” messageThen you already have some DKIM assigned, but the default key is missing and Cpanel is not liking that. This is what you need to do:
- Store and remove your DKIM keys in WHM -> Edit DNS Zone (read bellow for guide!)
- Revisit Settings -> Email Authentication – you should see the same message as on “Cpanel DomainKeys Disabled” screenshot.
- Activate DKIM
- Put back your custom DKIM keys
-
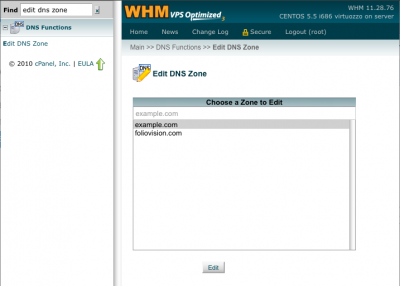
Go to Edit DNS Zone and pick the one which needs to be updated and click Edit:

WHM Edit DNS ZoneScroll down to see the whole DNS zone, we are interested mainly in the TXT records. There might be already some entries:

WHM Edit DNS Zone TXT entriesThe first record we are seeing it the default DKIM for this domain. It has a selector “default – notice that the selector (key) is in the first column field. Each domain can have multiple DKIM records, each bound to some selector.
The second record is SPF. It already contains some information which basically says that email sent from example.com might originate from the A record IP address (example.com itself) and also from other domain with name example-smtp-server.com. These mail servers will pass the SPF check. ?all means that the anything else will be treated as “Neutral“. Once your records are setup properly, you might want to change it to ~all which is “SoftFail“. More information in SPF Record Syntax article on openspf.org.
-
Now to do the changes, we will have to edit the SPF record and add another DKIM record, which will use the selector provided by SendLoop. We add the include statement from SendLoop settings into the SPF and create a new TXT entry for DKIM.
Notice that we use only ml._domainkey for the first field – .example.com will be appended automatically.

WHM Edit DNS Zone TXT entriesWe keep the TTLs at 1800 (second column, these values are in seconds – 30 minutes) while we are tweaking these values. Once the values are verified in SendLoop, we can edit the DNS zone again and rise the TTLs up to 14400 (4 hours).
Last step is to verify these records.
-
To verify SPF use: SPF Record Testing Tools on kitterman.com
Enter your domain name and hit “Get SPF records“, you should see this as a result:
evaluating...

SPF record passed validation test with pySPF (Python SPF library)! -
To verify DKIM use this tool at dkimcore.org. Enter your domain and “ml” as selector. You will see the exact key and
This is a valid DKIM key record
When this is done, you can re-add the domain in SendLoop and it will pass.
More about WHM Edit DNS Zone: article on docs.cpanel.net

Martin Viceník
Martin graduated as an engineer in Computer Science from Slovak Technical University in Bratislava. He grew up in Liptovský Mikuláš in northern Slovakia next to the beautiful Tatra mountains. He is the developer behind our FV Player.


Leave a Reply