If you have tried to set up network backup on OS X and you ran into the message “the backup disk image could not be created”, probably this article will help you.
OS X’s TimeMachine software had native support for network backup until the OS X Leopard 10.5.2 was released. Apple had its own reasons for the decision to remove network backup, but many advanced users including us at Foliovision would still like to be able to back up over the network.
We have a bunch of Mac Minis in a mixed network of Linux and Windows computers. We’d like to use all our Minis for work and not for backup and use one of our older Linux towers to store the backup.
How do you do it?
Fortunately Apple left us an option to turn-on network support for TimeMachine by running the following command in terminal:
defaults write com.apple.systempreferences TMShowUnsupportedNetworkVolumes 1
We can finally see network hardrives in selection for backup places. The problem might seems to be solved. No dice: it is only the beginning.
If you select a network drive for backup, you will see a very familiar message:
the backup disk image could not be created
Google automatically completes the phrase as soon as you type “the backup d”.
The real problem is in the file system which must be used for TimeMachine backup. TimeMachine only supports Mac OS Extended (Journaled) file system.
The solution is to create a place on the network, which will trick TimeMachine, into thinking that it holds data in Mac OS Extended (Journaled) file system. This trick is accomplished via copying a sparsebundle image (with special name) to a network share. You have to do following steps for to make TimeMachine successfully run a backup.
OVERVIEW
- Enable network hardrive support in TimeMachine
- Mount network shared place for backup data
- Create a sparsebundle virtual image
- Copy the sparsebundle virtual image to the network shared place
- Set up TimeMachine for network backup
- Optimisation and other information
1. Enable network hardrive support for the TimeMachine software
Network hardrive support for TimeMachine is turn off by default. For changing this fact we have to type following command to the terminal:
defaults write com.apple.systempreferences TMShowUnsupportedNetworkVolumes 1
After that, you should see mounted network harddrive in TimeMachine’s locations for backup. If it is not this case, probably a restart is needed.
2. Mount Network shared place for backup data
If you have a shared location for backup data on Linux server, you can map the directory as a drive to Mac in Finder application. You have to do following steps:
- Click GO and then “connect to server” in finder menu.
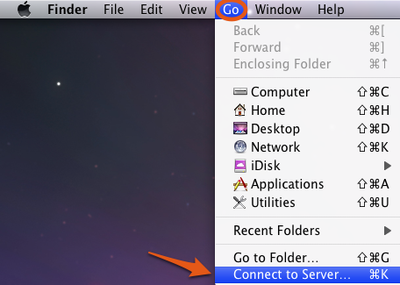
- Write following path if your sharing is based on protocol samba (SMB):
SMB://<IP_ADDRESS_or_COMPUTER_NAME>/<NAME_of_SHARED_PLACE>(e.g.SMB://192.168.1.25/Backup)

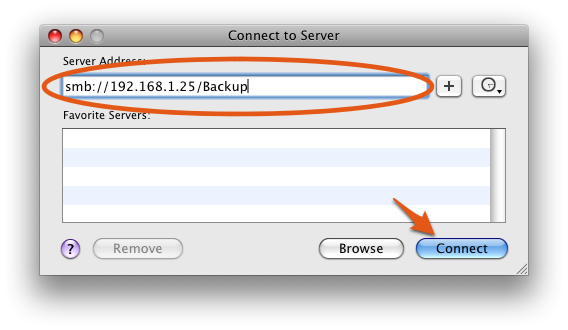
3. Create a sparsebundle virtual image
This step is very important, because the TimeMachine doesn’t allow to backup data to a network drive, which has any file system except “Mac OS Extended (Journaled)”. So we have to create a disk image in “Mac OS Extended (Journaled)” format.
We have two ways to do it:
- Open disk utility (Disk Utility) and create new virtual disk with following atributes:
Save As: <computer hostname>_<hex mac address of en0 interface>.sparsebundle(e.g.MacAlec_00ef9a048c4f.sparsebundle, if you forget to add.sparsebundle, it will be added automatically)Volume Name: Backup of <computer hostname>(e.g.Backup of MacAlec)Volume Size:the max amount of space you’re going to set aside for backups. (The volume size is depends on amounts of backup data. I have chosen150 GB)Volume Format: Mac OS Extended (Journaled)Encryption: NonePartitions: No partition mapImage Format: Sparse bundle disk image

- Note: Disk utility automatically mounts the image to system volumes. We won’t need the image mounted, so we can safely unmount it.
- The previous step can be done by one command in terminal:
hdiutil create -size 150g -fs HFS+J -volname "Backup of MacAlec" MacAlec_00ef9a048c4f.sparsebundle
3. Copy the sparsebundle virtual image to the network shared place
You can copy the sparsebundle image to the network shared place using one of the following steps:
- Copy the file to shared place by drag and drop operation in Finder application.
- If you prefer to work with the terminal, you can type this instead:
cp -r <sparsebundle_image_disc_location>/<computer hostname>_<hex mac address of en0 interface>.sparsebundle /Volumes/<NAME_of_SHARED_PLACE>/(e.g.cp -r /Users/Alec/Documents/MacAlec_00ef9a048c4f.sparsebundle /Volumes/Backup/)
Now we can safely delete the sparsebundle image copy on local computer once we are sure that it has been copied to the shared location.
Set up the TimeMachine for network backup
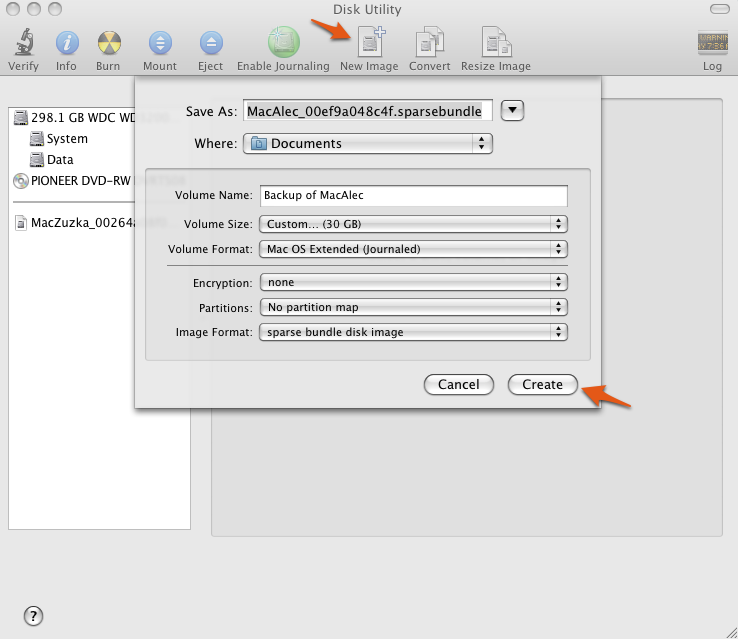
- Open TimeMachine preferences (in SystemPreferences).
- Click on Change Disk button for select the network drive for backup. (We have to select the “Backup”in our case.)
-

- The first backup will start in two minutes. TimeMachine supports incremental backup, thus the first backup can take very long time (it is depends on network bandwidth and amount of backup data).
If you want to eject the mapped shared volume (/Volumes/Backup in our case), you have to do it within the two minutes countdown before backup starts or after backup is finished. TimeMachine has its own mechanism for mapping network hardrives, so a backup process isn’t interrupted by your hard drive mounting or unmounting. TimeMachine will automatically mount the virtual sparsebundle image, when the backup starts. You will see Backup of <computer_name> as connected device on your desktop, so you won’t need to manually mount the network hard drive later.
4. Optimisation and other information
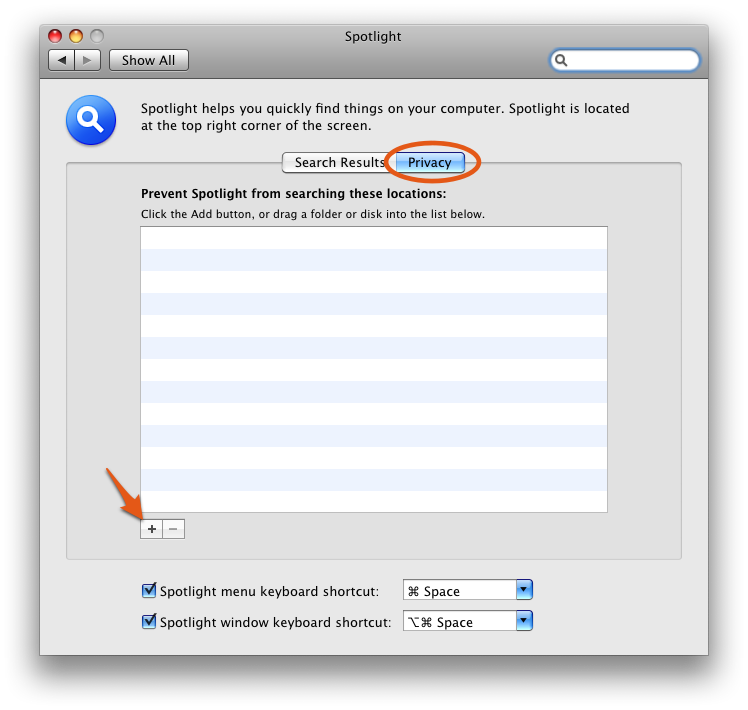
in order to avoid long delays in backup process caused by Spotlight indexing, You should set the Spotlight application to not index the mapped network drive. Here’s how to remove spotlight indexing for a hard drive:
- Open up the Spotlight software preferences in system preferences window
- Move to privacy options and add the network drive by plus symbol

If you’d like to back up a little less often, you can modify the file com.apple.backupd-auto.plist which is located in /System/Library/LaunhDaemons/ to change backup time interval. Open up the file in text editor and find the section:
<key>StartInterval</key>

<integer>3600</integer>
You should change the number 3600 to the number of seconds of your backup interval.
Result
I deliberately deleted some files to test backup reliability. This worked just fine. I was able to restore data from backup using TimeMachine’s restore feature. TimeMachine restore is easy to use and lets you choose data from any date and hour. If you have followed the exact steps above, you should have a working network backup now on a non-Apple computer.
I would like to thank Nick Hilliard and MacCorner for useful information.
Hi, i read your article and it’s really interesting.
I didn’t understand a thing: is it possible to backup a network drive (a windows share) with TimeMachine?
OK, i understood i can backup TO a network drive… but is it possible to backup A network drive on a local TimeMachine harddrive? And How to?
Let me know, please! :D
Hi Iceman,
If I understand you right, you have a little bit opposite problem.
Although TimeMachine supports backuping for external drives, I think that TM don’t support it for shared drives.
Thanks, Matej
Nice one!
…Works a treat and I now have twice the capacity of an Apple Time Capsule for a NAS backup rig half the price.
Changed the time interval too, because hourly backup was doing my dinger!
Honk Diddley
I cannot seem to get this to work. Perhaps the fact that the drive is formatted as a fat32? I created the sparsebundle although my mac address did not seem to look like your format. It just says “Making backup disk available” and then eventually throws an error 45 which seems to be a sparsebundle could not be created error. Why is it trying to create one when I already did that an copied it over?
Thanks for any help, which is always appreciated.
Dave
Thanks for your post! After walking through all the steps I endup with the message “The machine could not complete the backup. The network backup disk does not support the required AFP features.”
Could you tell me what I am doing wrong?
Thanks in advance!
Hi, I appreciate the post!
Will this procedure work with mountain lion?
I have used the terminal command that is supposed to force Time Machine to show unsupported drives, however when selecting a disk to back up to I do not see my network drive.
I have created and moved the sparsebundle file to the location on my network drive I wish to back up to.
Any help is appreciated!
ASF
Hi ASF,
I got it working on Mountain Lion. After walking through the above I ended up with the message: “The machine could not complete the backup. The network backup disk does not support the required AFP features.”
As said, after this I got it working on Mountain Lion. I am now backing up to a Windows7 pc.
Good luck, Brabbeldas
Hi ASF,
We are all Leopard and Snow Leopard here with NO plans to ever upgrade past Snow Leopard. If Apple doesn’t relent, any new Apple machines will be Hackintosh.
Let our readers know though please if you do succeed in getting the method to work with Mountain Lion. There’s no reason it shouldn’t, but Apple has been doing stranger and stranger things these days.
hi brabbeldas. like ASF, I went through all of the above and can’t get ML to see the .sparsefile so that it can even fail. would love to get ML to back up to my windows7 pc like I used to with SL.
larrycura
Thanks dude this process was simple and successful. I personally hate doing Terminal entry, point and click is more of my style. Way to go!